Showing posts with label Pinterest. Show all posts

Monday, November 7, 2022

Homemade Salted Nut Rolls

Back in August, I entered Homemade Salted Nut Rolls at the county fair. I saw the recipe on Pinterest that led to Shugary Sweets. My entry received first prize in the candy category.

Would I make this recipe again? No. Although the taste (especially the center filling) tastes just like the store-bought version - although much fresher - the process for getting the hot caramel onto the frozen center and then quickly rolling them in chopped peanuts is challenging. The caramel almost instantaneously hardens so that the peanuts can't adhere to it. At any rate, the recipe is below.

Salted Nut Roll 


Ingredients 

For the filling: 

½ cup unsalted butter 
7 ounces marshmallow cream 
5 cups powdered sugar 
1 teaspoon pure vanilla extract 

For the coating:
 
2 (11 ounce) bags caramel bits 
2 tablespoons unsalted butter 
2 cups chopped peanuts 

Instructions 

For the filling: 

Melt the butter and marshmallow cream in the microwave, for about 30-60 seconds, until the butter is fully melted. 

In a large mixing bowl, combine melted butter and marshmallow with the powdered sugar and vanilla. Cream together until just blended. Drop onto a large piece of parchment paper. 

Use your hands to knead the “dough” into a large ball. Divide the ball into 6 equal portions. You’ll then want to use your hands to roll each portion into a 7-8-inch log (the key is to keep it 1-inch thick around). 

Wrap each log in parchment paper and freeze for two hours until firm. 

For the coating: 

Melt caramel bits and butter in an 11x7-inch baking dish in the microwave, for about 1 ½ minutes, until smooth. The mixture will be thick, and the butter will separate from the caramel. That’s OKAY. 

Allow the caramel to cool slightly, then using your hands, combine the butter into the caramel and press the mixture into the bottom of the baking dish. Score it into 6 equal portions. 

To cover the marshmallow centers, unwrap the frozen log and using your hands, take one section of caramel and spread it over the center completely. It will feel like you’re working with playdoh. 

Once the entire log is covered, press the chopped peanuts into the caramel. Re-wrap in parchment paper and refrigerate. Repeat for each log. 

When ready to enjoy, slice each log into 1-inch pieces.

Wednesday, October 12, 2022

Peanut Butter Rocky Road Bars

For the county fair this year, I made several desserts. One of the desserts was Peanut Butter Rocky Road Bars - a pin I saw on Pinterest that led to Rock Recipes

This recipe reminded me of one that my mom used to make, but I don't recall her using peanut butter. I liked this version of Rocky Road Bars and would definitely make it again. Not only is it easy to make, but it is delicious...plus it won first prize in the county fair! 


Peanut Butter Rocky Road Bars 

Ingredients 

1/3 cup butter 
3/4 cup smooth peanut butter (I used crunchy peanut butter)
2 cups chocolate chips 
10 oz bag mini marshmallows
1 cup roasted peanuts, optional (I included the peanuts)
1/2 cup dried unsweetened or sweetened coconut, optional  (I didn't use coconut)

Instructions 

Lightly grease a 9x9 pan and line it with parchment paper. You can dust the bottom with 1/4 cup of the coconut if you are using it. 

In a medium saucepan, melt the butter and peanut butter together, then melt in the chocolate chips. As soon as the chocolate chips are melted, take it off the heat. You do not want to overheat this mixture. 

Add the marshmallows and peanuts to a large mixing bowl. Pour in the chocolate mixture and fold until the marshmallows are all covered in the chocolate mixture. 

Spread into the prepared pan and sprinkle the other 1/4 cup of dried coconut on top if you are using it. 

Chill for 3-4 hours before cutting into squares or bars (a serrated bread knife works well). Store in airtight containers. These will freeze quite well.

Thursday, August 11, 2022

Blueberry Coffee Cake

Last week, the Washington County Fair was held and I entered many different baked items. One of the items was a blueberry coffee cake that I had pinned on Pinterest that led to Amanda's Cookin'.

The recipe calls for two cups of blueberries which is a lot for the thick dough. Because of the number of berries and how thick the dough is, it took a while to get all the berries evenly distributed...or distributed the best I could. 

My family loved this recipe and it was gone in a couple of days. However, the judge at the fair said the ratio of blueberries to dough was too high. I got fourth place on the blueberry coffee cake. It's not that bad considering that the judge only awards six ribbons for all the fruit coffee cake entries. If there are more than six entries, those who don't place don't receive a ribbon and cash award. 

Next time I make the recipe, I'm going to reduce the amount of blueberries to either 1 1/4 cup or 1 1/2 cup. I'll see if that makes a difference in the final product. 

Ingredients 

2 cups all-purpose flour 

1/2 cup sugar 

2 teaspoons baking powder 

1 large egg, lightly beaten 

1/2 cup milk 

1/4 cup butter or margarine softened (NOT melted) 

1 teaspoon grated lemon peel 

2 cups fresh or frozen blueberries 

For the topping: 

1/3 cup sugar 

1/4 cup all-purpose flour 

1/4 cup walnuts, finely chopped (I didn't use) 

1/2 teaspoon ground cinnamon 

3 tablespoons cold butter or margarine 

For the drizzle (I didn't make this...plus it's an optional part of the recipe): 

1/2 cup powdered sugar 

2 tablespoons milk, more or less, to get to a drizzling consistency 

Instructions 

Preheat the oven to 350 F and spray or grease a 9-inch square baking pan. 

In a large bowl, whisk together flour, sugar and baking powder. Cut butter into small pieces. Add egg, milk, butter and lemon peel; mix just until dry ingredients are moistened. You may need to finish mixing with your hands to get all the flour incorporated. the batter will be very thick. 

Fold in the blueberries. Because the batter is so thick, this may take a few minutes. Spread into a greased 9-in. square baking pan. 

For topping, combine sugar, flour, walnuts and cinnamon in a mini food processor or bowl. Add butter and process, or cut in if doing by hand, until mixture is crumbly. Sprinkle over batter. 

Bake at 350 degrees F for 40-45 minutes or until cake tests done. 

For drizzle, combine the powdered sugar and milk. If too thick, add a few drops of additional milk at a time until it reaches drizzling consistency. Drizzles over the top of the cake and allow to sit until sugar solidifies. 

Notes 

This cake has a very thick batter that will have to be spread into the pan rather than poured.

It's very important to make sure you are measuring your flour properly so that you don't end up with more than you are supposed to. Always measure flour using the "scoop and sweep" method. (Basically, it is scooping the flour out of the bag or container and lightly putting it on waxed paper. Take a spoon and scoop some flour up and then sprinkle it into the measuring cup. This ensures that the flour doesn't get packed.)

Wednesday, August 10, 2022

Lavosh Crackers

Each year for the county fair, I enter a variety of baked goods. I never use recipes that are "tried and true." No...that would take away the element of surprise for me. I search Pinterest or my "want to make" files for recipes I want to try. 

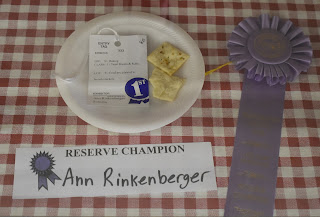
This year, for the Crackers category, I made Lavosh Crackers from this pin that lead to Chef not Required. The recipe called for a Middle Eastern spice. I didn't have it, so I ended up using an "Everything" topping - the kind that you use on bagels. 

The number of ingredients is minimal and the process to make them very easy. I really liked how they turned out...plus they won a Reserve Champion award at the county fair! Not bad for a first try making this recipe. 

The only thing I would change about this recipe is to mix the topping into the dough so that it doesn't fall off the crackers. Lightly sprinkling a little bit of salt on the crackers would be good.

Ingredients 

1 cup plain/all-purpose flour 

¼ tsp fine salt plus extra for sprinkling 

3 tablespoon olive oil, divided 

¼ cup water, plus more if needed 

1 teaspoon za'atar spice blend (I used the Everything topping instead)

¼ teaspoon ground cumin (I skipped this since I was using a different set of spices)

Instructions 

Preheat oven to 375F and set aside 2 baking trays (see notes). Combine za'atar (1 tsp) and ground cumin (¼ tsp) in a small bowl and set aside. (Alternatively, measure the everything topping and put aside.)

In a medium-size bowl, combine plain (all-purpose) flour (1cup) and salt (¼ tsp), making a well in the center. Add olive oil (2 tbsp) and water (¼ cup) to the well, and mix gradually until you have a shaggy dough (if it looks a little dry add more water 1 teaspoon at a time). 

Still in the bowl, use your hands to bring this shaggy dough into a rough ball then turn the dough ball out onto a lightly floured surface. Knead the dough slightly to make it more uniform, about 10-15 strokes is all it should need. 

Divide this ball of dough into three even-ish portions. Working with one portion at a time, roll out the dough as thinly and evenly as you can - about 1/18" thick. Using a sharp pizza cutter, cut dough into your desired shapes (long strips, squares, etc.) then place the crackers on a baking tray. You don't want them to overlap, but they also won't spread as they cook. 

Using a pastry brush, brush the remaining olive oil (1 tbsp) evenly over the surface of the crackers, then sprinkle them evenly with combined za'atar and cumin. Finally, sprinkle with fine salt to taste. 

Bake for 6-10 minutes, or until golden brown. Allow to cool completely on the baking tray. 

Notes 

I divided my dough into 3 portions just to make it a more manageable size to roll out. I find this makes it easier to roll the dough thinly and evenly. The thinner the better for these crackers. These crackers don't spread as they cook, so you can put them pretty close together on the baking tray. 

You really need to watch these crackers carefully in the oven. Because they are so thin, a difference of 1 minute can leave you with very dark crackers! Check on them first at the 6-minute mark - because ovens vary and so will your dough thickness. 

The crackers can be stored in an airtight container once completely cool. 

Wednesday, July 27, 2022

Giant Window Star

Every July and August, it is county fair time. Whether it is 4-H projects or open class projects, the girls and I have been competing in two local fairs now since Sophia was six years old - so 2007. 

For the past few years, I have chosen a complex window star from one of the pattern books I used to use when I sold window stars on Etsy. I haven't sold anything on Etsy since I was in a car accident several years ago and had serious neck and upper-shoulder issues which resulted in surgery.

At any rate, I looked at Pinterest to get some ideas for another window star pattern. I came across this pin which led to Conscious Craft

Window star I made. 
It took 512 folds to make this star!

There are quite a few window stars that are unique and beautiful on that website. The one that caught my eye is made up of 8 stars of varying sizes: 3 stars in the smallest size, 3 stars in the medium size, and 3 stars in the largest size. 

Each point of the stars uses the same pattern that has 8 folds. 

With 8 points (per star) multiplied by 8 folds per point multiplied by the number of stars in each grouping (see table below), it took a total of 512 folds to make this star. 

Paper Size      Number of Stars        8 Points x 8 Folds x The Number of Stars 

0.75”x1.5”                 3                                                192 

1.5”x3”                      3                                                192 

3”x6”                         2                                                128 

                                                                      Total folds: 512 

The smallest paper size is very challenging to fold. I have never folded anything that small - much less eight times. Needless to say, I was relieved when those 24 points were done. The medium paper size is easier to work with, yet still smaller than that with which I normally fold. The larger paper size is very easy to fold. 

To best see the folds and pattern of this star, hold it up towards the light.


Friday, November 12, 2021

Apple Cider Doughnut Cake

A couple of months ago I saw a recipe on Facebook for Apple Cider Doughnut Cake. It led to a pin on Pinterest. Earlier this week, I wanted to make the recipe and got all the ingredients for it. 

When I clicked on the image, it was just a picture - no recipe. Of course...no directions. Then I noticed a recipe to the right of the picture. However, as I read it closer, it was a different recipe than what was pictured. The recipe calls for additional ingredients: 1/2 cup of melted butter, 3 or 4 eggs (the picture showed 3 eggs), 1 teaspoon of vanilla, and 1 cup of shredded apples. The measurements for the spices were different too. 

The recipe indicated it was a Betty Crocker recipe. So, I looked up an Apple Cider Doughnut Cake recipe by Betty Crocker on Google. Sure enough, there was a recipe. Like the typed recipe on Pinterest, this one didn't have applesauce either, but it had butter. 

I decided to create my own recipe - a combination of all of the recipes - to see what happened. The recipe I created was:

Ingredients 

Cake:

1 box of yellow cake mix

¾ cup apple cider

½ cup applesauce

4 eggs

2 teaspoons cinnamon

1 teaspoon nutmeg

1 teaspoon vanilla

1 cup shredded apples

Topping:

3 tablespoons melted butter

1/4 cup sugar

1 teaspoon ground cinnamon

Directions 

Put the cake mix, apple cider, and applesauce in a bowl, and mix together. Add the eggs. 

Then add the cinnamon, nutmeg, vanilla, and shredded apples. 

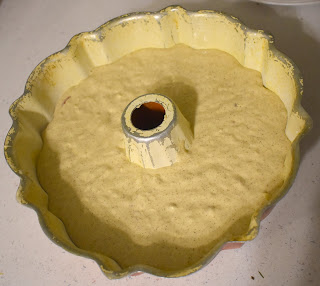
Put into a bundt pan that has been sprayed and floured. 

Baked at 350 degrees for 30-40 minutes. Let cool in the pan for 20 minutes. 

Remove from the pan to the cooling rack. Brush cake with 3 tablespoons of melted butter. Cover with a mixture of ¼ cup sugar and 1 teaspoon of ground cinnamon. 

The recipe doesn't really taste like a doughnut. It is more of a cake. It is very light and fluffy. Looking at the picture on Pinterest, it looks like the recipe could use more of the sugar-cinnamon topping. 

Would I make it again? Yes. I'm not sure I would add the nutmeg next time. I'd like to see what the cake tastes like with just the cinnamon. I would use the 1/2 cup of applesauce again in lieu of the 1/2 cup of butter (as is shown in the Pinterest picture) because I think it is healthier to use applesauce versus butter. 

Wednesday, April 21, 2021

Nestle Toll House Chocolate Chip Pie

When I lived in Charlotte, North Carolina, there was a pie I ate at a local restaurant that was delicious. I believe they termed it a "derby pie." However, it is very similar to this Nestle Toll House Chocolate Chip Pie I made recently for Paige's birthday I saw the recipe on Pinterest that led to the Food website.


This is a super easy recipe to make and I would make it again since everyone loved it. It would have to be a special treat because the nutritional value is not that great. Ignore the dents in the top. That's where the birthday decorations and candles were placed.

INGREDIENTS 

1 unbaked 9-inch deep-dish pie pastry (I made homemade pie crust using my Grandma's recipe)
2 large eggs
1/2 cup all-purpose flour 
1/2 cup granulated sugar 
1/2 cup brown sugar, packed 
3/4 cup butter, softened 
1 cup Nestle semi-sweet chocolate chip 
1 cup chopped walnuts (I didn't include any walnuts) 

DIRECTIONS 

Preheat oven to 325 degrees. Beat eggs in a large mixer bowl on high speed until foamy. Beat in flour, granulated sugar, and brown sugar. 

Beat in butter. Stir in chocolate chips and nuts. 

Spoon into pie shell. 

Bake for 55-60 minutes or until knife inserted halfway between outside edge and the center comes out clean. 

Cool on wire rack. Serve warm with vanilla ice cream, if desired.

NUTRITION INFORMATION

Serving Size: 1 (102) g Servings 
Per Recipe: 8 

AMT. PER SERVING and % DAILY VALUE 

Calories: 609.7 
Calories from Fat 376 g (62 % daily value)
Total Fat 41.8 g (64 %)
Saturated Fat 17.8 g (89 %)
Cholesterol 92.2 mg (30 %)
Sodium 293.3 mg (12 %)
Total Carbohydrate 57.7 g (19 %)
Dietary Fiber 3.2 g (13 %)
Sugars 37.8 g (151 %)
Protein 7.1 g (14 %)

Wednesday, February 24, 2021

Star Bread for Mardi Gras

For Mardi Gras this year, I made Star Bread which I saw on Pinterest. The pin leads to Sally's Baking Addiction. The bread was easy to make and tasted delicious. I made the version with crystallized ginger and brown sugar, so it had some spiciness to it. Rather than leaving the Star Bread plain, I put some powdered sugar frosting on it and gold, purple, and green sprinkles on it for the holiday

This is the recipe:


Prep Time: 2 hours, 30 minutes
Cook Time: 30 minutes
Total Time: 3 hours
Yield: Serves 8 

Note: If the bread rises for too long, it could lose its shape. Follow the timing exactly as it is in the recipe.

Ingredients 

2 teaspoons instant or active dry yeast
3 Tablespoons granulated sugar 
3/4 cup (180ml) whole milk 
1/4 cup (60g) unsalted butter, softened to room temperature 
1 large egg 
2 and 1/3 cups (290g) all-purpose flour (spoon & leveled), plus more as needed (I needed quite a bit more flour)
1 teaspoon salt 
filling (see recipe note) 
egg wash: 1 large egg beaten with 1 Tablespoon (15ml) milk 
2 Tablespoons confectioners’ sugar 

Instructions 

Make the dough: Place the yeast and sugar in the bowl of a stand mixer fitted with a dough hook or paddle attachment. Or, if you do not own a stand mixer, a regular large mixing bowl. 

Heat the milk on the stove or in the microwave until warm to touch, about 110°F (43°C). Pour warm milk on top of yeast/sugar. Whisk gently to combine, then loosely cover with a clean kitchen towel and allow to sit for 5-10 minutes. The mixture will be frothy after 5-10 minutes. 

If you do not have a mixer, you can mix by hand in this step. Add the butter, egg, flour, and salt. Beat on low speed for 3 minutes. Dough will be soft (note: at this point, I added more flour since it was not at a workable stage). 

Using lightly floured hands, form it into a ball. If the dough is too sticky to handle, add 1-3 more Tablespoons of flour, but you want a very soft dough. 

Place the dough in a greased bowl (nonstick spray is fine) and cover with plastic wrap or aluminum foil. Place in a slightly warm environment to rise until doubled in size, around 60-90 minutes. For this warm spot, I suggest using the oven. Preheat to 150°F, then turn the oven off after preheating. Place the covered bowl inside and shut the oven door. This is your warm environment. 

Prepare filling: Line a large baking sheet with parchment paper or a silicone baking mat and prepare your star bread filling. See all the options in the recipe notes below. 

Assemble the bread: Watch the video on the link above to guide you through this step. Punch down the dough to release the air. Place dough on a lightly floured work surface. Divide into 4 equal pieces and, with a floured rolling pin, roll each out into a thin 10-inch circle. 

Place the bottom circle on a prepared baking sheet. If it lost its circle shape, use your hands to form the edges back into a round shape. Top with filling, then layer the remaining circles and filling on top. The top layer does not have filling on it, so only 3 of the 4 circles will be topped with filling. 

Using a sharp knife or pizza cutter, cut any scraps around the edges so you have an even circle. Place a 3 inch round object or bowl in the center and make an indent. This is the center of the star. Now it’s time to cut strips from the edge to the center 3-inch circle. Using a pizza cutter, cut 16 even strips. 

Using both hands, grab two strips and twist them away from each other twice, then press the two ends together to make a point. Your star bread will have 8 points. Cover the shaped bread with plastic wrap or aluminum foil and let it rest for 20 minutes. 

Preheat oven to 350°F (177°C). Bake the bread: Using a pastry brush, lightly brush the star bread with egg wash. This ensures a beautifully-shiny golden brown bread. Bake for about 25- 30 minutes or until golden brown on top. If you notice the top or points browning too quickly, loosely tent the star bread with aluminum foil. 

Remove from the oven and cool for 5 minutes. 


Dust confectioners’ sugar on top and enjoy warm. Cover and store leftover star bread at room temperature for 1-2 days or in the refrigerator for 4-5 days. 

Notes 

Layers: The top layer does not have filling on it, so only top 3 of the 4 shaped circles. 

FILLINGS

Cinnamon Sugar: Spread 1 Tablespoon of very soft unsalted butter onto each of the 3 circles. (3 Tbsp total.) Mix 1/4 cup (50g) granulated sugar with 1/2 teaspoon ground cinnamon. This is the total amount and you will divide it between each circle. Sprinkle evenly over butter on each circle. 

Nutella: Spread 1 heaping Tablespoon of Nutella onto each of the 3 circles. Nutella is difficult to spread onto soft dough, so warm it up in the microwave for a few seconds until it’s a spreadable consistency. 

Your favorite jam: Spread 1 Tablespoon of jam onto each of the 3 circles. 

Butter, Brown Sugar, + Ginger: Spread 1 Tablespoon of very soft unsalted butter onto each of the 3 circles. Mix 3 Tablespoons packed light or dark brown sugar with 1/2 teaspoon ground cinnamon and 1 Tablespoon finely chopped crystallized ginger. Sprinkle evenly over butter on each circle. 

Apple Butter or Pumpkin Butter: Spread 1 heaping Tablespoon onto each of the 3 circles. 

Chai Spice: Spread 1 Tablespoon of very soft unsalted butter onto each of the 3 circles. Mix 3 Tablespoons granulated sugar with 1/4 teaspoon each ground cinnamon, ground ginger, ground cardamom, and ground allspice. Sprinkle evenly over butter on each circle. 

Butter + Cinnamon Sugar + Walnuts + Dates: Spread 1 Tablespoon of very soft unsalted butter onto each of the 3 circles. Mix 3 Tablespoons packed brown or granulated sugar with 1/4 teaspoon ground cinnamon, and 2 Tablespoons each finely chopped walnuts and pitted dates. Sprinkle evenly over butter on each circle. 

Cinnamon sugar + Orange Zest + Fresh or Dried Cranberries: Spread 1 Tablespoon of very soft unsalted butter onto each of the 3 circles. Mix 3 Tablespoons packed brown or granulated sugar with 1/4 teaspoon ground cinnamon, 2 teaspoons orange zest, and 3 Tablespoons finely chopped fresh or dried cranberries. Sprinkle evenly over butter on each circle. 

Savory: Reduce sugar in the dough to 1 Tablespoon. Spread 1 heaping Tablespoon of tomato sauce or pesto onto each of the 3 circles. (Try my kale pesto!). Top each with a light layer of shredded cheese, herbs, and/or chopped pepperoni. 

Sunday, July 19, 2020

Fresh Spring Rolls with Peanut Sauce

For quite a while I've been wanting to make spring rolls. I found an easy recipe on Pinterest for Fresh Spring Rolls with Peanut Sauce that led to Sally's Baking Addiction. The most labor-intensive part is the chopping. Once that is done, the assembly of the spring rolls takes just a few minutes.


This recipes makes 8 spring rolls. They are flavorful - especially with the homemade peanut sauce. I will definitely be making these spring rolls again!

Ingredients

Spring Rolls

2 ounces rice vermicelli or maifun brown rice noodles* (I used rice noodles)
1 teaspoon toasted sesame oil (I doubled the amount to give the noodles more flavor)
1/4 teaspoon fine sea salt
1 cup torn butter lettuce, ribs removed
1 cup very thinly sliced red cabbage (I used green cabbage since that's what I had on hand)
2 medium carrots, peeled and cut into matchsticks or sliced into strips with a julienne peeler
2 Persian (mini) cucumbers or 1 small cucumber, thinly sliced or sliced into strips with a julienne peeler (I used a regular cucumber)
2 medium jalapeños, ribs and seeds removed, thinly sliced
1/4 cup thinly sliced green onions
1/4 cup roughly chopped fresh cilantro
1/4 cup roughly chopped fresh mint
8 sheets rice paper (spring roll wrappers)

Peanut Sauce

1/3 cup creamy peanut butter
2 tablespoons rice vinegar
2 tablespoons reduced-sodium tamari or soy sauce (I used soy sauce)
2 tablespoons honey or maple syrup (I used honey)
1 tablespoons toasted sesame oil
2 cloves garlic, pressed or minced
2 to 3 tablespoons water, as needed (I didn't use the water)

Directions

To make the spring rolls: Bring a pot of water to boil and cook the noodles just until al dente, according to package directions. Drain, rinse them under cool water, and return them to the pot. Off the heat, toss the noodles with the sesame oil and salt, and set aside.

Fill a shallow pan (a pie pan or 9″ round cake pan works great) with an inch of water. Fold a lint-free tea towel in half and place it next to the dish. (Note: I used a paper towel.) Make sure your prepared fillings are within reach. Combine the green onion, cilantro and mint in a small bowl, and stir.


Place one rice paper in the water and let it rest for about 20 seconds. You want the sheet to be pliable, but not super floppy. Carefully lay it flat on the towel or paper towel.

Leaving about 1 inch of open rice paper around the edges, cover the lower third of the paper with a few pieces of butter lettuce, followed by a small handful of rice noodles, some cabbage, and a few strips of carrot, cucumber and jalapeño. Sprinkle generously with the herb mix. (Note: I added edible flowers to the spring rolls. This was the first thing I put down before the rest of the ingredients.)


Fold the lower edge up over the fillings, rolling upward just until the filling is compactly enclosed. Fold over the short sides like you would to make a burrito. Lastly, roll it up. Repeat with the remaining ingredients.

To make the peanut sauce: In a small bowl, whisk together the peanut butter, rice vinegar, tamari, honey, sesame oil, and garlic. Whisk in 2 to 3 tablespoons water, as needed to make a super creamy but dip-able sauce.

Serve the spring rolls with peanut sauce on the side. You can serve them whole, or sliced in half on the diagonal with a sharp chef’s knife.

Note: The peanut sauce can be made in advance. You also can prepare the vegetables several hours or up to 1 day in advance, and store them in an air-tight container (they will lose freshness with time). The spring roll wrappers tend to dry out with time or once chilled, so spring rolls are best assembled shortly before serving. If you’d like to keep them fresh for a couple of hours, store them under a lightly damp, lint-free tea towel at room temperature (the skin tends to harden in the refrigerator).

Wednesday, June 10, 2020

Patriotic Strawberry Spinach Salad

A couple weeks ago, I was looking for a healthy recipe to have with our Memorial Day meal. Came across one for the Best Ever Strawberry Spinach Salad on Pinterest. The recipe led to The Slow Roasted Italian.

The salad dressing is easy to make and quite flavorful. I had to substitute a couple of ingredients since I'm trying to use what I have on hand.

The candied pecans are something that you have to watch closely since they go from doing well initially to cooking very quickly and potentially burning. I removed them from the stove just in time.

The salad itself has a variety of ingredients that offer bites of sweetness along with neutral flavors but different textures.


Ingredients

Candied Pecans (I doubled this so I had extra for other salads)

1 tablespoons butter
1 tablespoons packed light brown sugar
1/2 cup pecan halves (I used walnuts since we didn't have pecans on hand)
Pinch of salt

Dressing (I doubled this as well)

2 tablespoons granulated sugar
1/4 cup extra light tasting olive oil
1/4 cup white wine vinegar (I used rice wine vinegar)
1 tablespoon Dijon mustard (I used a sesame-honey mustard dip)
2 garlic cloves, minced (I used 1/2 teaspoon instead of the 2 cloves)
1/2 teaspoon salt
1/4 teaspoon pepper
1/4 teaspoon paprika

Salad

10 ounces fresh baby spinach - rinsed, dried and torn into bite-size pieces
1/4 small red onion, sliced
1 quart fresh strawberries, hulled and quartered
1/2 cup fresh blueberries
1/2 avocado, cut into bite-sized pieces
1/2 (5 ounce) package blue cheese crumbles

Directions

Place a sheet of parchment paper on the counter top to dry the pecans.

In a small skillet over medium heat, melt butter. Add pecans, sugar, and salt. Stir until the pecans are well coated. Stir until the sugar caramelizes, about 3-5 minutes. (Note: watch very carefully! This process goes quickly and can burn in a split second.)

Spread onto parchment paper. Separate pecans. Allow to cool.

Meanwhile: in a pint size mason jar combine dressing ingredients. Seal and shake until well combined. Set aside on the counter. (I used the Ninja food processor and set it to puree. It blended the ingredients beautifully.)

In a large bowl, combine the spinach, onions, strawberries, and blueberries. Pour about 1/2 of dressing over salad, and toss. Top with avocado, cheese and candied nuts. Serve remaining dressing on the side.

Refrigerate for 15 minutes before serving (or serve immediately).

Serve with the remaining dressing on the side. Enjoy!


Notes:

The dressing may solidify in the refrigerator. It is best to allow dressing to sit on the counter for a while before serving. Shake well before using.

If you are making the salad ahead, prep the salad ingredients and refrigerate. Then dress the salad about 15 minutes before serving. This will help keep the spinach from wilting.

Mozzarella or feta cheese are also amazing on this salad.

Lighten it up by subbing plain pecans for the candied ones and eliminate the sugar from the dressing.

Add sliced grilled chicken for a fabulous summer meal.

Thursday, May 21, 2020

Bacon Egg and Cheese Wreath

With Sophia home from college, there are more of us now who eat eggs for breakfast. I remember making a Bacon, Egg, and Cheese Brunch Ring many years ago. Found the recipe again on Pinterest that led to Bacon Time with the Hungry Hypo.

Everyone enjoyed the Bacon, Egg and Cheese Brunch Ring (except Paige who doesn't like eggs). A serving is one of the crescent roll sections and the exposed egg section next to it. It's a generous portion that is quite filling. We were all full for most of the day and didn't need to eat again until mid-afternoon.


Bacon, Egg and Cheese Brunch Ring

Prep - 25 min
Total -55 min
Servings - 8

Ingredients

4 slices bacon, cut in half crosswise
1/3 cup plus 1 tablespoon milk
4eggs
Salt and pepper, if desired
1/4 cup chopped red bell pepper (I didn't use this)
1 can (8 oz) Pillsbury™ refrigerated crescent rolls or 1 can (12 oz) Pillsbury™ Grands!™ refrigerated crescent dinner rolls
1 cup shredded Mexican cheese blend (4 oz)
Chopped fresh cilantro, if desired (I didn't use this)
1 cup Old El Paso™ Thick 'n Chunky salsa, if desired (I didn't use this)

Directions

Heat oven to 375°F (350°F for Grands!™ crescents). Line large cookie sheet with cooking parchment paper. In 10-inch nonstick skillet, cook bacon over medium heat about 4 minutes or until cooked but not crisp, turning once. (It will continue to cook in oven.) Set bacon aside; drain all except 2 teaspoons bacon drippings from skillet.

In medium bowl, beat 1/3 cup of the milk, the eggs, salt and pepper with fork or whisk until well mixed. Stir in bell pepper. Pour egg mixture into skillet. As mixture heats, portions of eggs will begin to set. Gently push cooked portions with metal spatula to outside edge of skillet. Avoid stirring constantly. As more egg sets, push it to edge, and place it on top of the already set egg mixture. Cook 2 to 3 minutes or until eggs are thickened throughout but still moist.

Meanwhile, unroll dough; separate into 8 triangles. On parchment-lined cookie sheet, arrange triangles with shortest sides toward center, overlapping in star shape and leaving 4-inch round circle open in center. Crescent dough points may hang over edge of cookie sheet. Press overlapping dough to flatten.

Place bacon on each of the triangles. Sprinkle 1/3 cup of the cheese onto widest part of dough. Spoon eggs over cheese. Sprinkle with 1/3 cup of the cheese.


Pull points of triangles over eggs and cheese, and tuck under dough to form ring (filling will be visible). Carefully brush dough with remaining 1 tablespoon milk; sprinkle with remaining 1/3 cup cheese.


Bake 20 to 25 minutes (18 to 23 minutes for Grands!™ crescents) or until deep golden brown. Cool 5 minutes. With broad spatula, carefully loosen ring from cookie sheet; slide onto serving platter. Garnish with cilantro and salsa.

Tuesday, May 19, 2020

Cinnabon Cinnamon Rolls - Copycat Recipe

For Mother's Day, Sophia asked me what I would like for breakfast. Although I was hungry for waffles, our waffle maker was broken by Aspen who pulled it off the counter and it fell to the floor. So much for using that again.

As I looked through ideas on Pinterest, nothing grabbed my eye until I saw: Copycoat Cinnamon Rolls! The recipe led to Fun Happy Home.

The recipe requires some time to prepare, but is much easier and less time-consuming that the recipe that my Grandma made. It is packed full of flavor and each roll is very filling. Sophia did a nice job with making and baking the rolls.


We would definitely make this recipe again! I'd like to try the overnight and freezer methods to see how they taste compared to making them, baking, and eating them in one day.

Cinnabon Rolls Dough

1 (1/4 ounce) package active dry yeast
1 cup warm milk
½ cup granulated sugar
⅓ cup softened butter
1 tsp salt
2 eggs
4 cups flour

Cinnabon Cinnamon Rolls Filling

1 cup packed brown sugar
3 tbsp cinnamon
⅓ cup butter, softened

Cinnabon Cinnamon Rolls Cream Cheese Icing 

6 tbsp butter
1½ cups powdered sugar
¼ cup cream cheese
½ tsp vanilla
⅛ tsp salt

Cinnabon Recipe Directions

To start the rolls, dissolve the yeast in the warm milk in a large bowl.

In a separate bowl, add sugar, butter, salt, eggs, and flour, mix well.

Pour the milk/yeast mixture in the bowl and mix. If using a stand mixer you will want to use the dough hook. Mix well until well incorporated.

Place dough into an oiled bowl, cover and let rise in a warm place about 1 hour or until the dough has doubled in size.

Roll the dough out on a lightly floured surface, until it is approx 16 inches long by 12 inches wide. It should be approx ¼ inch thick.

Make the Copycat Cinnabon Filling

To make cinnamon filling, combine the butter, brown sugar and cinnamon in a bowl.

Spread the mixture evenly over the surface of the dough. Alternatively you can spread the butter first on the dough and then the brown sugar and cinnamon mixture.

Carefully starting from the long edge, roll the dough down to the bottom edge. The roll should be about 18 inches in length. Cut the roll into 1½ inch slices.

Place the cut rolls into an oiled 13×9 inch pan Cover them with a damp towel. Let them rise again for another 30 minutes until they double in size.

Preheat oven to 350 degrees and bake for 20 minutes or until golden brown.


While the rolls are baking, mix all icing ingredients and beat well with an electric mixer until fluffy.

When the rolls are done, spread generously with icing.

Overnight Cinnabon Cinnamon Roll Recipe

We know that making homemade cinnamon rolls can be time-consuming and that you may not want to rise at the crack of dawn so you can have them ready for breakfast.

You can make this recipe up to the point where you cut your rolls and put them in the pan. Once they’re cut and in the pan, instead of letting them rise, cover them and put them in the fridge.

Take them out in the morning, let them rise for the second time, and then bake as instructed. {Please note that it will take a little longer for them to rise as they will be cold from being in the fridge. Allow for 15-30 minutes longer for rising.}

Freezer Cinnamon Rolls Recipe

Did you know that you can freeze the cinnamon rolls while they’re still dough and then cook them? This is a total game-changer and will allow you to have homemade cinnamon rolls any time you want. And it will also allow you to make less at a time.

Simply make them up to the point where you cut them and shape them. Instead of putting them in the pan, put them on a cookie sheet (without letting them touch) and put them in the freezer for 1-2 hours. This will allow them to freeze enough that they won’t stick to each other.

Once they are frozen, place them in a gallon-size freezer bag and store in the freezer til 12 hours before you’re ready to use them.

The night before you want to make them (or 12 hours before if you’re making them for the evening), move cinnamon rolls to the fridge and allow them to thaw.

When you’re ready to bake them, take them out, place them in a greased pan and let them rise til they’re double in size. This will take around an hour since they’re going to be super cold to begin with.

Once they’ve risen, bake as usual.

Monday, May 18, 2020

Asian-Style Spicy Coleslaw

On Mother's Day, I tried a new recipe Asian-Style Spicy Coleslaw, that I saw on Pinterest. It led to Food and Wine.


I had some cabbage that I wanted to use and had all but one of the ingredients on hand. That's the type of recipe I like - one where I have everything available and don't have to go out and get something special.

The recipe has a flavorful and spicy flavor which I enjoyed. I wasn't able to detect the Asian fish sauce in it, but Sophia could and said she didn't care for it. I think it could be eliminated since it isn't a critical ingredient.

I made half a recipe since I knew that only Sophia and I would eat it. So, I kept some of the dressing aside to add as we were eating it so the cabbage and other vegetables wouldn't soften.

I would make this recipe again - maybe next time without the fish sauce and see if that makes a difference in the taste.

Ingredients

1/4 cup plus 2 tablespoons smooth peanut butter
3 tablespoons fresh lime juice
3 tablespoons Asian fish sauce
3 tablespoons water
3 tablespoons sugar
3 garlic cloves, minced
1 tablespoon Sriracha chile sauce
2 pounds napa cabbage, thinly sliced (12 cups) (I didn't have this so used regular cabbage)
3/4 pounds red cabbage, thinly sliced (3 cups) (I didn't have this either so I used regular cabbage)
3 medium carrots, julienned
2 red peppers, thinly sliced
3 tablespoons chopped cilantro
15 mint leaves
Salt and freshly ground pepper

Directions

In a medium bowl, whisk the peanut butter with the lime juice, fish sauce, water, sugar, garlic and Sriracha. In a large bowl, toss the napa and red cabbages with the carrots, peppers, cilantro and mint. Toss the salad with the dressing and season with salt and pepper. Serve right away.

Sunday, May 17, 2020

Making Some More Window Stars

One of my goals this year is to try some new window star patterns that I found on Pinterest. One of the patterns I tried turned out very similar to the image shown on Pinterest. I used 3"x6" lime-green kite paper to create it.


This is the pattern and instructions.


I made both a yellow and lime-green version of the window star. I think lighter colors are better so the pattern can be seen easier than with a dark color.


I tried making the window star again, but using 2.5"x5.5" paper. The results were somewhat different with the smaller size, but no other significant changes:


This is how the sizes compare - with the yellow using the larger 3"x6" paper and the lime green using the 2.5"x5.5" paper.


The second star I made didn't even come close to the image in the image on Pinterest. This is my result.


This is the pattern that was linked to Fashion and Recipes. It has quite a few patterns on the website. I used 3"x6" pink kite paper.

Now as I look at it I'm wondering if I forgot the last two steps with folding the points into the middle. I may have to try this one again.


It's been fun trying some new patterns during the stay-at-home order. It passes the time and gives me something creative to do.

Thursday, April 30, 2020

Quick and Easy Breadsticks

This year Olivia participated in the Food and Bread Show for 4-H. She and I looked through Pinterest to see if there was a recipe she wanted to make. She saw a pin for Quick and Easy Breadsticks that led to Jamie Cooks It Up.

The breadsticks are the first yeast bread that Olivia made. She was very happy with how they turned out. The recipe makes 36 breadsticks. However, she cut her breadsticks into squares so there are 72 bread squares. They're easier to eat...and, like the girls said, you can have more because they are smaller.


Ingredients

1 1/2 C warm water
2 T sugar
1 T yeast
1/2 t salt
3 1/2- 4 C flour
1/4 C butter (not that nasty margarine crap)
3/4 C grated Parmesan or mozzarella cheese (Olivia used mozzarella)
Johnny's Garlic Seasoning (Olivia used Kingsford garlic seasoning - Tucson flavor)

Directions

Mix the water, sugar and yeast together in a measuring cup or in the bottom of your mixer. Let it sit for 5 minutes.

Add the salt and the flour, one cup at a time, until it is well incorporated. Mix on high for 5 minutes. Let the dough rest for 5 minutes.

Melt the butter and pour half of it into a jelly roll pan. (Olivia used a cookie sheet since we didn't have a jelly roll pan. She also would recommend spreading the butter around the cookie sheet so the breadsticks in the corner don't stick.)

Place the dough in the center of the pan. Let it sit for 2 or 3 minutes. Letting the dough rest makes it much easier to shape.
Spread the dough out flat onto the pan until it reaches all of the edges. Doing all of the spreading and cutting of these bread sticks, in the pan makes cleaning up your counter so much easier. 

Pour the other half of the butter onto the dough. Spread it around with your hands. Sprinkle the Johnny's Garlic Seasoning all over the dough, and then the mozzarella cheese.

With a pizza cutter cut the dough into three rows lengthwise, and then into about 12 little height wise rows.

Put the pan into a 170 degree oven for about 7-10 minutes. The breadsticks should rise about 1 inch.

Turn you oven up to 350 and bake for about 12 minutes, or until golden brown.


When they come out of the oven let them sit and rest again for about 5 minutes. Then redefine your cutting lines with the pizza cutter. (Olivia said that the lines were not that clear because she cut the dough before putting on the cheese since I missed that part when reading the recipe to her as she made it.) So, she cut them into 72 squares which actually worked out well. The bread squares are easy to handle and are a good size.

Tuesday, April 28, 2020

Copycat Starbuck's Lemon Loaf

Each year for 4-H there is a Food and Bread Show. When the girls were younger, they signed up to participate on year. They had decorated cupcakes, casseroles, and a variety of dishes. They were excited about participating. Then there was an ice storm the night before the Show and the roads were too icy the following morning. The Show was cancelled.

It has been difficult to get them to want to participate in it again. Until this year. There is online judging which they can do anytime until April 25th. The judge will review all the entries and make awards from those submitted.

One of the recipes that Olivia made for the Quick Bread division was a Copycat Starbuck's Lemon Loaf. The pin on Pinterest led to The Country Cook.

The bread is a dense, moist one with a flavorful glaze made from fresh lemon juice and powdered sugar. Despite the 2 tablespoons of lemon zest and lemon extract, it is not an overpowering lemon-flavored bread. We both felt like there could be even more lemon flavor in the bread to match the frosting.


The cost of making a loaf of this bread is about $7.43 or 62 cents per slice. Compared to purchasing a slice at Starbucks for over $3, this saves a lot of money.

Nutritionally, this recipe has lower calories, fat, carbohydrates, and sodium. It has a higher level of protein because Olivia used Greek yogurt instead of sour cream.

This recipe is easy to make (minus the hand-zesting of six lemons to get enough lemon zest) and we would definitely make it again.

Ingredients

For the cake:
3 eggs
1 cup granulated sugar
1 cup sour cream or Greek yogurt
1/2 cup vegetable oil
2 tbsp lemon zest (about six lemons)
2 tbsp lemon extract
1 1/2 cups all-purpose flour
2 teaspoons baking powder
1/2 teaspoon salt

For the lemon glaze:
1 cup powdered sugar
2-3 tbsp lemon juice

Instructions

Preheat oven to 350F. Spray a 9×5-inch loaf pan with floured no-stick cooking spray.

In a large bowl, add the eggs, sugar, sour cream, oil and whisk vigorously until smooth and combined. Finally, add the lemon zest, lemon extract, and stir well to combine.

Then, stir in flour, baking powder, salt, and stir until just combined. It’s okay if it’s a bit lumpy. Pour batter into prepared loaf pan. Bake for about 50 to 52 minutes. (Note: it took 1 hour and 11 minutes for the bread to bake in our oven.)

Optional: In the last 10 minutes of baking, tent pan with foil (loosely drape a sheet of foil over pan) to prevent excessive browning on the top and sides of bread before center cooks through. (Note: Olivia needed to do this for the last 21 minutes of baking.)

Allow loaf to cool in pan on top of a wire rack for at least 30 minutes before turning out onto cooling rack to finish cooling before glazing.

For the glaze, in a medium bowl, combine the powdered sugar and lemon juice until smooth and combined. You may need to play with the sugar and lemon juice amounts a bit for desired consistency and flavor. (Note: we used 2 tablespoons lemon juice so the frosting was thick - just like at Starbucks.)

Evenly spread or drizzle glaze over bread before slicing and serving.


Notes

Cake will keep airtight at room temperature for up to 5 days or in the freezer for up to 6 months.

Don’t store it in the fridge because it’ll dry out.