Showing posts with label Creative Every Day. Show all posts

Sunday, November 10, 2013

St. Martin's Bags and Croissants (Martinshornchecn) - Art Every Day Month - Day 10

Monday marks St. Martin Day or Martinmas. One of the ideas I found on Pinterest was for St. Martin Bags that was described on Catholic Cuisine.

St. Martin's Bags, which are a tradition in Malta, are given to children; and filled with a wide variety of treats associated with the feast.

The finished St. Martin's Bags that I made.

So, for the tenth day of Art Every Day month, I made cloth bags for each of us. On the outside of each bag, I drew and colored a goose with fabric markers. I added a bit of grass and some yellow flowers.

Tracing the outline of the goose.

Once I had finished the illustration, I sewed the bags along three sides.

Bags sewn along three edges.

Then I clipped the edges with a pinking shears.

Corners clipped along the bottom edges.

Next, I turned the bags inside out so the right sides were facing out; and used a pinking shears to give a decorative edge to the top of the bags.

There are lengths of ribbons in various patterns to tie the bags closed.

Some of the items that will be included in the bags are:
~almonds
~cashews
~peanuts
~tangerines
~dried apple slices
~raisins

Rosemary Cashews

Rosemary cashews
(Photo taken on November 4, 2007.)

With the exception of the tangerines and dried apple slices, we had all the items on hand. Other items which could be included - but won't be in our bags this year (maybe next year, though) - are:
~walnuts
~hazelnuts
~chestnuts
~oranges
~figs
~pomegranates

The bags are decorated with a drawing of a goose - a symbol associated with St. Martin. The goose became a symbol of St. Martin because it is said that when trying to avoid being ordained bishop he had hidden in a goose pen, where he was betrayed by the cackling of the geese.

Hundreds of Geese Flying Overhead
Hundreds of geese flying overhead.
(Photo taken on December 3, 2011.)

St. Martin's feast day falls in November, when geese are ready for killing. St Martin’s Day was an important medieval autumn feast, and the custom of eating goose spread to Sweden from France. It was primarily observed by the noblemen and craftsmen in town. In the peasant community, not everyone could afford to eat goose, so many ate hen or duck instead

Colorful Rooster
Rooster.
(Photo taken on July 15, 2012.)

Later today, I am also making Martinshornchecn (St. Martin's Day Croissants) which will be served tomorrow. These sugared croissants were given out as a special treat to children for Martinmas. The following recipe is from Cooking with the Saints:

Ingredients
3/4 c. milk
1 tsp. dry yeast
4 c. flour
3 Tbsp. sugar
1/4 tsp. salt
3 eggs
3/4 c. butter
2 egg yolks
1/2 c. coarse sugar

Directions
Heat milk to lukewarm and dissolve the yeast. Sift the flour into a bowl, make a well in the middle and add the yeast mixture and sugar and salt. Work to a smooth dough and let rest for 1 hour in a warm place.

Add the eggs and half the butter and work it back into a smooth dough. Some flour may have to be added if the dough is too sticky. Melt remaining butter.

If you cannot get coarse sugar, crush sugar cubes with a rolling pin. On a floured surface roll out dough to a thickness of about 1/8 inch. Cut into 8-inch squares. Brush with butter and sprinkle with the coarse sugar.

Starting from one corner, roll up each square and turn in the ends to make croissant shapes. Brush with egg yolks and sprinkle with more sugar. Preheat oven to 400 degree F. Transfer croissants to a buttered baking sheet and bake for about 25 minutes.

Makes 12 to 16 large croissants.


Saturday, November 9, 2013

Window Star Lantern (Tutorial) + St. Martin's Day - Art Every Day Month - Day 9

I've been making Waldorf-inspired window stars for several years now. However, the only way I've displayed them is on windows where the sun's rays shine through the translucent paper and illuminate the pattern of the stars.

At night, the window stars are rather dull looking since there's no light to reveal the pattern. That is until I saw a pin that led to River Blissed that showed an alternative way of displaying window stars.

Basically, I made a very small window star out of German kite paper. I chose red, orange, gold, and yellow paper to tie in with the fall nature table we have.

The window star lantern that I made is on the right.
Two lanterns in the back that Sophia and Olivia made
years ago that use tissue paper and Mod Podge.

I chose a canning jar from the empty jars I have on hand. Any jar would be fine to use - even ones that once held food (e.g., peanut butter, jam, olives). Then, I found a piece of very thin translucent paper to cover the entire jar. I used Mod Podge to affix it to the jar.

The lantern with the translucent paper covering the jar,
and the window star Mod Podged on top of the paper.

Then, I attached the window star, also using Mod Podge. One thing I noticed that is different from hanging the stars on the windows is that the star with Mod Podge on it has wrinkles in it. It's not a huge deal when looking at the lantern from afar. However, from a crisp/precise standpoint, it no longer looks like the window stars that I make.

After letting the Mod Podge dry, I put a candle inside the jar. This is the result:

Lantern on the nature table.

This is one of the lanterns that I have made during Art Every Day Month in preparation for St. Martin's Day, which is on November 11th. St. Martin's Day also is known as the Feast of St. Martin, Martinstag, or Martinmas.

Historically, it has been a time for feasting celebrations because it was when autumn wheat seeding was completed, and the annual slaughter of fattened cattle produced "Martinmas beef." In addition, hiring fairs were held where farm laborers would seek new posts.

November 11 is the feast day of St. Martin of Tours, who originally was a Roman soldier, and then was baptized as an adult and became a monk. He was a kind man who led a simple and quiet life.

The most famous legend of his life is that he once cut his cloak in half to share with a beggar during a snowstorm, to save the beggar from dying of the cold. That night he dreamed that Jesus was wearing the half-cloak Martin had given away. Martin heard Jesus say to the angels: "Here is Martin, the Roman soldier who is not baptized; he has clothed me." St. Martin became known as friend of the children and patron of the poor.

The holiday of St. Martin's Day originated in France, and then spread to Germany, Scandinavia, and Eastern Europe. It celebrates the end of the agrarian year and the beginning of the harvesting.

Field corn and tassel
Field corn in a neighbor's field that is 
ready to be harvested.

Although the holiday is celebrated in many countries, I am particularly interested in German customs since that is where the majority of my ancestors are from. A widespread custom in Germany is bonfires on St. Martin's eve, called "Martinsfeuer." At one time, the Rhine River valley, would be lined with fires on the eve of Martinmas.

In the Rhineland region, Martin's day is celebrated traditionally with a get-together during which a roasted suckling pig is shared with the neighbors.

The nights before and on the night of November 11, children walk in processions carrying lanterns, which they made in school, and sing Martin songs.

The Girls and their cousin Ashley with Balloon Lanterns
Sophia and Olivia with their cousin, Ashley, in December 2007
with balloon lanterns that they made.

Usually, the children begin their walk at a church and then go to a public square. A man on horseback dressed like St. Martin accompanies the children. When they reach the square, Martin’s bonfire is lit and Martin’s pretzels are distributed.

Homemade Pretzel
Homemade pretzel that the girls made in 2009.

In some regions of Germany (e.g., Rhineland, Bergisches Land) in a separate procession the children also go from house to house with their lanterns to sing songs and get candy in return.

The origin of the procession of lanterns is unclear. To some, it is a substitute for the St. Martin bonfire, which is still lit in a few cities and villages throughout Europe. It formerly symbolized the light that holiness brings to the darkness, just as St. Martin brought a hope to the poor through his good deeds.

Even though the tradition of the large, crackling fire is gradually being lost, the procession of lanterns is still practiced.

Friday, November 8, 2013

French Muffins - Art Every Day Month - Day 8

This is a bit unusual for the Art Every Day Month challenge, but today's focus is on making a recipe I've never tried before. This one is for French Muffins that I saw on a pin that led to Velvet Lava.

French muffin that I made.

Originally when I pinned the recipe, I read it so quickly that I thought it said, "French Toast Muffins." I guess French toast was on my mind at the time.

Anyway, the recipe looks similar to one I've made before, yet I wanted to have something warm and homemade for breakfast. The ingredients are all ones that are commonly found in a kitchen:

Muffin Ingredients
1/3 c. butter, melted
1/2 c. sugar
1 egg (preferably room temperature)
1 1/2 c. all purpose flour
1 1/2 tsp. baking powder
1/2 tsp. salt
1/4 tsp. nutmeg
1/2 c. milk

Topping Ingredients
1/2 c. sugar
1/2 c. butter, melted
1 tsp. cinnamon

Preheat oven to 350 degrees. Sift together sugar, flour, baking powder, salt, and nutmeg. Add melted butter, egg, and milk. Stir just until combined, but still a bit lumpy. Do not overmix (overmixing will ruin the texture of the baked muffins).

Scoop batter into muffin tins that have sprayed with cooking spray. Bake for 20-25 minutes, or until they just start to turn a bit golden at the edges.

For the topping, mix sugar and cinnamon in a bowl. Place melted butter in another small bowl. Dip the warm muffins in melted butter (either just the top or the entire muffin), and dip or roll the muffin in the cinnamon-sugar mixture.

 Note: You may have leftover topping. The extra topping could be used for dipping, while eating the muffins. The other option is to reduce the ingredients by half so you don't waste food.

Enjoy!

The recipe makes 12 smaller muffins.
If more batter was used per muffin,
the recipe would yield about 7-8 muffins.

*~*~*~*~*~*

As a side note, I've been enjoying going through each of my boards on Pinterest and choosing a project to do each day. Having the Art Every Day Month challenge.  - where I am creating/making something each day during November - has been a great motivator "to do" rather than "to look."

Thursday, November 7, 2013

Fingerless Gloves (Tutorial) - Creative Every Day - Day 7

Today I continued to look through my Pinterest boards for the seventh day of the Creative Every Day challenge; and came across a pin for fingerless gloves that led to The Renegade Seamstress. I've been looking for practical ways to use the felted wool sweaters that I have on hand, and this is something that I definitely can use.

Fingerless gloves I made from a felted wool sweater.
The edges the fingers and thumb and hand-embroidered
with red embroidery floss.

The first step to making fingerless gloves is to felt a 100% wool sweater by washing it in alternating hold/cold water; and then drying it at a high temperature. An adult-size sweater generally felts down to a child-size sweater.

Then, cut the ends of the arms off. The cuffs will be the part that goes on the forearm, while the cut part fits around the fingers and thumb.

Part of the sleeves cut off.

The next step, according to The Renegade Seamstress is to make a pattern of your hand. I did this, but felt like it was an unnecessary step.

The shape of my hand cut out from a piece of paper.

Turn the sleeves inside out so the right side is inside. This is the time to sew a seam along one side if the sweater sleeve needs to be reduced in width. In my case, the felting process made the sleeve quite small so I could skip this step.

So, then I used a sewing machine to sew a triangle to separate the fingers from the thumb.

Sewn seams separate the fingers from the thumb.

Snip the middle of the "V" to separate the finger section from the thumb section.

Using a fabric scissor, cut the section out between the "V."

 Turn the gloves inside out and then using 3 strands of embroidery floss or a heavier Pearle cotton thread, blanket stitch along the edges to finish them off.

The palm side of one of the fingerless gloves that I made.

After seeing how the embroidery floss disappears into the wool, I would do any other fingerless gloves with a heavier Pearle cotton so that the finished edge stands out a bit more.

Once I was done, Sophia asked me to make her a pair of the gloves. I have more colorful sweaters waiting to be felted, so it will be fun to make another pair in a brighter color.

Wednesday, November 6, 2013

Felted Wool Hot Pad (Tutorial) - Creative Every Day - Day 6

For several years I have collected wool sweaters from secondhand shops and felted them so I could make hand-embroidered toys with them. I have quite a bit of wool on hand, so I wanted to start using it up by making some practical items for use around the home.

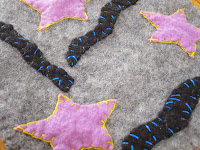
Felted wool and embroidered potholder 
that I made.


As I've been going through my Pinterest boards during Creative Every Day month, I came across a pin about how to make felted wool potholders at Mother Earth News. There's another similar pin that also links to Mother Earth News. However, there are slightly different images of the potholders.

The process I followed is relatively easy. Basically, I cut a 7" x 7" piece of felted wool and cotton fabric. The wool was rather thick, so I only used one layer. If it had been thinner, two pieces of wool would have been better.

Above: 7-inch square on a felted wool sweater.
Below: 7-inch square on cotton fabric.

I cut out three stars and three curvy lines from black and purple felted wool. I embroidered the stars onto the gray wool using the blanket stitch; and the curvy lines using a straight stitch in a haphazard pattern.

Stitched stars and curvy lines.

I put the wool and cotton fabric so the right sides were facing out.

Then, I turned the long edges of the a 2"x 6" piece of cotton fabric in towards the middle and then did a blind stitch along the edge. I inserted 1 1/2 inches of the two short ends in one corner between the stacked layers.

Next, I pinned around the edges of the potholder.

Blanket-stitching the wool and fabric together.


Using embroidery floss, I secured the loop by making several small stitches through the wool and hanger to secure it in place.

Back of the potholder.


Then, I stitched around the sides of the potholder using the blanket stitch.

Part of both sides of the potholder showing.


Now the potholder is ready to be used.

Tuesday, November 5, 2013

Waldorf Star Lantern - Creative Every Day - Day 5

For the fifth day of the Creative Every Day challenge, I wanted to try making Waldorf star lanterns that I had pinned on Pinterest. The pin leads to Passengers on a Little Spaceship that has a detailed tutorial and video about how to make the lanterns.

Several months ago, Sophia and Olivia did some wet-on-wet watercolor paintings on 12" x 12" paper. I had wanted to make the lanterns back then, but never got around to it.

So, I took out the paintings again and followed the tutorial. The first lantern seemed to go well. My measurements and folding were not as precise as I normally do for my window stars. The star lanterns - just like the window stars - benefit from being accurate with folding. There was a point which didn't come out as easily as the other ones.

One of the star lanterns I made.

The second lantern I ended up folding incorrectly by doing both the mountain and valley folds on the same side. This may not seem like a huge deal, but it is when it comes to the last step of folding the points. A couple of them I tore...tried to tape it...felt it was a lost cause...and crumpled up what I had done.

Feeling defeated...but refusing to give up...I found a 12"x12" piece of scrapbooking paper. I followed the directions again and found using the scrapbooking paper to be much easier because of its weight.

The lantern went together much quicker than the first two I made.

Lantern made from scrapbooking paper
with a battery-operated tea light inside it.

Since the lanterns are made of paper, I used a battery-operated tea light. No matter where I put the lanterns with the tea lights, they weren't as colorful or glowing as I anticipated.

This is the lantern made from watercolor paper.
It did not glow and show the pattern of the painting
like pictures that I've seen of other lanterns.

So...how were the lanterns made? First, use either a 12"x 12"piece of scrapbooking paper or watercolor paper that has been painted and dried.

Next, fold the paper (with the right side up) into eight sections.


Then, divide the paper into 16 sections by turning the paper over. (Note: this is where I made the mistake with the second lantern as pictured below. The painted side should be on the wood...not facing up.) By having the painted side down, the second set of eight folds are "valleys" to the first 8 fold's "hills."

To make the 8 valley folds, line up the existing folds and the center point of the next section. See the picture below for a visual instruction. When the paper is folded over, draw a line with a pencil so that the little triangular section is marked.


Cut the triangles off so the shape looks like the picture below.


Now, with the folded sides down, fold in the sides so that the shape becomes a square. Unfold and repeat this process again by moving the paper 45 degrees. The painted side of the paper should still be face down for this step.

Next, turn the paper over so the painted side is face up. Fold in the corners (there will be marks/folds in the corners).


Out of the entire process, this last part is the trickiest step. Basically, between each of the folded corners, reach to the other side of the paper and pull the center point towards the painted side of the paper. It will turn into a triangle in the process.


Pull the triangle over the edge of the lantern until it is in the same position as the corner triangles.  The paper starts to crumple, but that is okay. 


Keep repeating this process until all the edges are pulled over. The bottom of the lantern will be pointed at this stage. Simply press down and out on the inside of the lantern, and it will lay flat on a table.


Add a battery-operated tea light...and it's done!


It feels good to be trying some of the pins on Pinterest and seeing what the results are - some I've been happy with...and others not so much. Regardless of the product, I'm enjoying the process of creating each day. 

Monday, November 4, 2013

Creative Every Day - Double-Sided Napkins (Tutorial) - Day 4

One of the new things we are trying this school year is to follow a daily rhythm that includes a color of the day. (I wrote about how an ideal week and each day looks in terms of this rhythm and homeschooling on my plan for the 2013-14 school year.)

The "color of a day" concept is commonly found in early learning Waldorf settings. I didn't do this when the girls were younger, so I wanted to see if it may be something that we'd enjoy now that they are older. I thought it would be a gentle way of adding another layer of rhythm to our daily and weekly lives.

Set of double-sided yellow napkins I made 
to use on Wednesdays.

The colors of the day in our home are:
=> Sunday - white
=> Monday - red
=> Tuesday - orange
=> Wednesday - yellow
=> Thursday - green
=> Friday - blue
=> Saturday - purple

The way that we use the color of the day is through our table settings: tablecloths, place mats, cloth napkins, table runners, coasters, and/or candles.

Other ways - related to meal time - that could reflect the color of the day include:
=> using serving platters or bowls in the color of the day,
=> displaying flowers on the table that show the color of the day,
=> serving fruits, vegetables, or smoothies that are the color of the day.

So, today for the Creative Every Day challenge I looked at one of my boards on Pinterest that focuses on Waldorf rhythms and meal times. I found a pin about how to make double-sided cloth napkins. It led to Rhythm of the Home which gave step-by-step directions about how to make the napkins.

The following are the steps I took to make a set of double-sided napkins. First, I found fabrics that I had on hand that coordinated. These were then washed and ironed.

Next, using a rotary cutter and board, I cut 8-inch and 12-inch squares from the fabric.


After placing the right sides of two of the fabric squares together, I pinned the edges together.


I sewed them together with about a quarter-inch seam.


There was a small opening left in one of the sides so I could turn the sewn squares inside out.


Next, I pressed the napkins so that the seams were flat. I clipped the extra threads and the corners of the napkins so the edges would lay flat.


Then, I turned the napkins inside out so the right sides were facing out.


I placed pins along the edges that needed to be turned under and sewn.


Last, I sewed along the edges to add a finishing touch.


Now they are ready to  be folded and used at our next meal.