To do this stitch, you need to know how to do the chain stitch and twisted chain stitch. Barred chain stitch is a sequence of these two stitches alternating each other.
Chain Stitch (top row) + Twisted Chain Stitch (middle row) =
Barred Chain Stitch (bottom row)
I did the chain stitch several weeks ago as part of TAST. However, I had not yet learned the twisted chain stitch. So, I needed to look that up and learn that first.
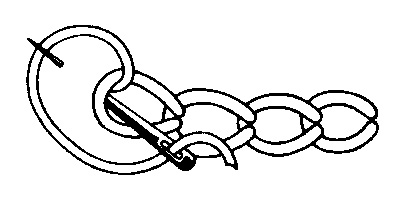
"And here's the twisted variation. Can you see the difference?
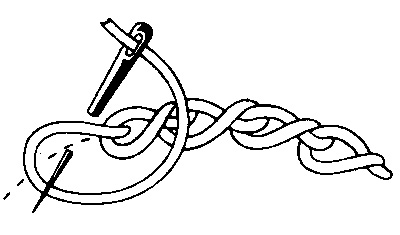
"Begin as you would for chain stitch by bringing your thread to the front. Now, instead of inserting your needle into the same hole where your thread emerged, insert it slightly to the left. Take a small slanting stitch and come up on the drawn line. Your thread loops over and then under the needle.
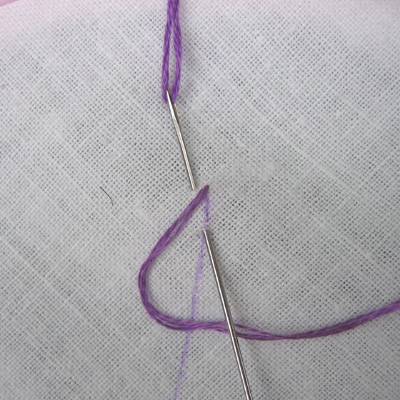
Photo Source
"Pull the thread through until it tightens and the loop rests on the emerging thread. This is the first link in the chain.
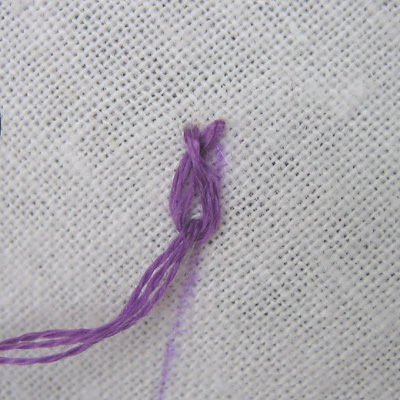
Photo Source
"To begin the second link, take the needle from just outside the loop down to the drawn line. Again, keep your thread under the needle or it won't twist. With regular chain stitch you would take your needle down inside the loop not outside of it—that's the difference.
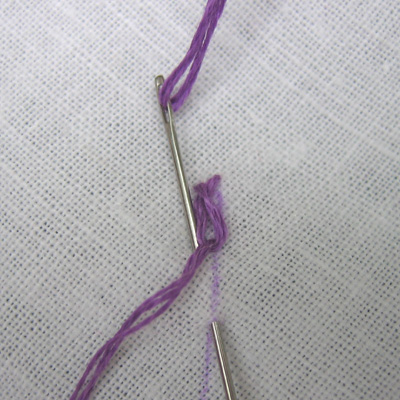
Photo Source
"Continue making links in the chain and when you come to the end take a small stitch to tack the last loop down."
Once I practiced doing the twisted chain stitch, I looked for step-by-step tutorials for the two stitches this week and found one at Sarah's Hand Embroidery Tutuorials. There's one for the barred chain stitch and the alternating barred chain stitch.
Although conceptually I understood the process, I had a lot of difficulty with the alternating barred chain stitch. The left side I could do, but for some reason the right side wasn't twisting like it should. Honestly, at this point I was going to give up since I kept having to take out and re-do the stitches. There are several right twisted chain stitches in the swirl sampler that I simply left because I didn't know how to correct them.
So, I went back to In a Minute Ago, and looked at the image of the alternating barred chain stitch there. From the picture, I could figure out how to do the right hand side of the twisted chain stitch.
Alternating Barred Chain Stitch
On the swirl sampler, the dark blue section (the starting point) is riddled with errors. On the next two shades of blue, I started to understand how to do the alternating barred stitch. On the three green and three yellow shades, I varied the length of the twisted chain stitch to see what it looks like.
I think there's a lot of potential with this stitch and ways that it could be embellished with beading and other embroidery stitches. Since the sampler is going into my TAST embroidery journal, I can't add beads to the pieces or the journal wouldn't close.
As a side note, the fabric used for the samplers was white cotton that I spray-painted with fabric dye and then squished together to create random patterns. Nine shades of cotton embroidery floss were used on the swirl; and three colors were used with the "math equation" sampler.
- the grass has emerged and is a bright green;
- the northern magnolia bush is in full bloom;
- the spring peepers and other frogs are singing in the pond;
- migrating birds are returning (including a bluebird I saw earlier in the week, lots of robins, and black phoebes which aren't typically here - or perhaps they are but I haven't noticed them before); and
- trees are showing buds and small leaves.
This is typical of late-May in Minnesota - not March. It's an early and very welcomed spring.


3 comments:
That looks complicated. I like the feathery look you got when the stitches were longer. Yes, I can see adding beads to this for decoration. :)
Very creative ~ so detailed and delicate ~ yet strong also ~ lovely post ~~ namaste, ^_^
Your journal pages are so beautiful! You chose perfectly soft colors. I love how the stitching really 'adds' to the texture of the pages. Thanks for sharing! xoxo
Post a Comment