Sunday, February 28, 2010

February Journal Quilt


This is the second journal quilt that I've made in 2010. This represents things and people who I love - both who are living and have passed on.

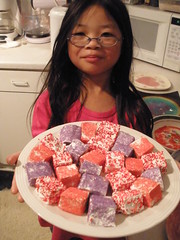
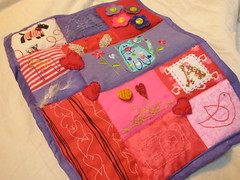
I chose the colors of purple, pink, and red for 2 reasons: (1) they are commonly seen around Valentine's Day and (2) they represent one of my favorite colors (purple), Sophia's favorite color (pink), and one of Olivia's favrotie colors (red).

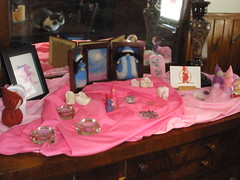
The size of this quilt is approximately 9x12 inches. The backing is purple and wraps around the front for the edging.

With the exception of the fabric that the cat is on (which is knit), it is all cotton fabric.

I won't be including knit fabric in a quilt anytime soon. It definitely was too challenging to work with and made the side of the quilt uneven. My skill level with quilting isn't high enough to know how to work with knit and cottons together.

This is what the top half of the quilt represents:
http://www.flickr.com/photos/picturesbyann/4453492997/in/photostream/

This is what the bottom half of the quilt represents:
http://www.flickr.com/photos/picturesbyann/4453494707/in/photostream/

Sunday, February 21, 2010

St. Patrick's Day Decorations

Made three origami window stars for St. Patrick's Day. Am combining these with papercuttings backed with the same colors of green translucent paper to decorate the windows.

This week, my daughters and I will change the seasonal/nature table from a Valentine's Day theme to St. Patrick's Day theme. The origami stars are placed on the windows nearest the nature table.

I have more window stars available in my shop, Harvest Moon by Hand.


Saturday, February 20, 2010

Growing Sprouts at Home

Growing sprouts at home is fun, and is a great hands-on lesson for children. They get to grow their own food in a matter of days...which is rewarding for children who like to see the result of their work quickly.

To grow sprouts at home, simply use 2 tablespoons of sprouting seeds (from your local co-op or natural foods store) and place in a jar. In the picture to the right, Sophia is pouring her seeds into the jar.

Add water to the jar and rinse the seeds a couple of times. Then, place water in the jar, covering the seeds about an inch. The seeds need to soak in water for 8-12 hours in the dark.

Then for 2-3 days, they need to be rinsed 2-3 times per day. At that point, they are ready to grow. They should be kept away from light during the growing period.

Olivia rinsing her sprout seeds during class.

Soon we'll be eating sprouts on our sandwiches and salads.

This was one of several hands-on activities the girls did at a recent class I taught to homeschool children about seeds and agriculture.


Friday, February 19, 2010

Math Activity with Fruit


I'm teaching a four-session agricultural class to a group of homeschool children. This class is for 4 girls (Olivia and Sophia plus 2 other homeschooled girls).

For this class, I'm teaching the children about seeds - in fruit, wildflowers, grasses, sprouts, and edible ones. They did a variety of hands-on activities including the one pictured to the right and below.

Here, to the right, the girls are cutting their pieces of fruit and then counting the number of seeds in them. They then put the number of seeds on a chart and then compare their estimates to the actual count of seeds.


After they were done, they enjoyed their fruit snacks.

Thursday, February 18, 2010

Handmade Lunch from Felt and Fabric

Made this trio of items for a swap on Swap-Bot.

The snack bag is made from 100% cotton fabric and closes with a strip of velcro. Although the bag is not air-tight (like a plastic bag would be), it is safe to have next to food. Opted not to use rip-stop nylon or PUL which I've seen used in other snack bags, but aren't safe to use next to food.

The decoupaged clothespins are covered with decorative paper. They can be used to hold chip bags closed.

The wool felt pita sandwich is hand-embroidered using cotton embroidery floss. All the pieces are made from wool felt.

I enjoy making felt food and the clothespins, and have different items available through my shop, Harvest Moon by Hand.


Monday, February 15, 2010

Black Capped Chickadee on Feeder

This is one of the feeders I made using blocks of homemade suet, an onion bag, and some yarn to hang it from a branch.

Within 5 minutes of putting the feeders in the trees, the birds were already finding and eating from them.


Sunday, February 14, 2010

Homemade Marshmallows

Olivia got up early to finish making the homemade marshmallows that we started making on February 13th.

She rolled each marshmallow in sprinkles - red, purple, white, and pink. I rolled some in powdered sugar.

It was an interesting process making homemade marshmallows. It takes a while to make them (it was a 2-day process for Olivia and me), but the end result was worth it.

The homemade marshmallows have a different texture than the packaged ones, and do not melt when you put them in hot chocolate.


I'm curious to see what they would taste like toasted over a fire and used in smores.

Here's another picture from the marshmallow-making experience:


Ingredients being mixed for 15 minutes.


Saturday, February 13, 2010

Frost Covered Trees


Frost Covered Tree
Originally uploaded by Pictures by Ann
These are some of the trees in the south pasture/nature trail area. This is looking east with the rising sun in the background.

I like waking up on mornings when everything is covered with frost. It seems like everything sparkles once the sun rises.

Wednesday, February 10, 2010

Olivia in Ice Fort


Olivia in Ice Fort
Originally uploaded by Pictures by Ann

Took the icicles from the roof and turned them upside down to create this little ice fort for Olivia.

A few days later, we went out again and took down more icicles and added another "room" to the ice fort.

Sophia and Olivia also have a three-room snow fort that they and I have been building this winter.

One of the themes for 3rd grade for Waldorf education is homes and homebuilding. Both the girls have been enjoying building different "homes" this winter with snow and ice.

Sunday, February 7, 2010

Squirrel Papercuts


Squirrel Papercuts
Originally uploaded by Pictures by Ann

I made these Valentine's Day theme papercuts for my daughters - the red one is for Olivia and the pink one is for Sophia.

There's a free pattern (see below) that I printed onto white copy paper and cut it out. Then, I traced around the openings onto another sheet of white copy paper and cut it out using a sharp scissors.

Glued translucent paper onto the back (red on one heart and pink on the other) - the same kind that I use for my window stars. Tissue paper also could be used.

Here's the link to the free pattern: PATTERN.


Thursday, February 4, 2010

Valentine's Day Table

This is the table that Olivia and I set up for Valentine's Day. At other times of the year, there are more natural items on it, but since the ground is covered with snow, there's not much out there to bring indoors.

So, this year I made 5 gnomes in 2 different sizes to add to the table. The other items have been made or purchased in the past.

The beautiful felt sculpture in the pictures in the back was custom-made by Soft Earth Art in New Zealand. The two figures represent my daughters.

Monday, February 1, 2010

Decorating for Valentine's Day


6 Red Window Stars
Originally uploaded by Pictures by Ann
These are six of the newest window stars that I made for Valentine's Day. A couple of the patterns I've done already and really like (the big star in the upper left and the middle one in the right column).

The stars on the bottom rows of both columns are new patterns.

With a couple more months of a winter white landscape, the red is a vibrant and necessary color to remind myself that spring IS around the corner.

The stars are made with a special paper cut into small pieces. Each piece is folded multiple times to create a point. The points are then glued together to reveal the star pattern.

Another set of these stars - as well as other ones that I make in a variety of colors - are available in my shop, Harvest Moon by Hand.