Thursday, April 29, 2010
Box Day
(The brown paper is what came in the boxes for packaging. We hadn't cleaned the living room yet.)
They can't wait to get started with homeschooling for next year. They'll have to wait though. They wrap up this year's curriculum in about 2 weeks.
Then, we take a break during late-May and June to do projects for the county fair in July as well as doing more hands-on projects around the home and in the garden.
We start homeschooling using the Sonlight curriculum by the beginning of July...though it's integrated with projects for the fair, continued activities outside, and summer programs/swimming lessons/camps.
Monday, April 26, 2010
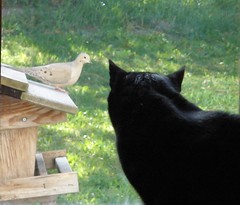
Shadow Watching a Dove
Saturday, April 24, 2010
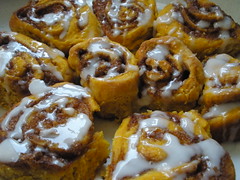
Pumpkin Buns
These rolls are made with canned pumpkin which gives them a rich, deep-orange color. The filling is butter, sugar, brown sugar, and cinnamon. The icing is from confectioners' sugar and dairy-free milk.
They were absolutely delicious...especially right out of the oven. The recipe came from a Family Circle magazine.
Made these for a 52 Weeks of Baking swap on Swap-Bot. Am trying about 3 new recipes per week (even though the swap is for 1 recipe).
My goal is to try recipes that I have from a variety of sources, but haven't yet made. If they turn out well, I'm typing the recipe and taking a picture of what the food looks like.
Eventually, I should have quite a few recipes and pictures - along with comments from the girls about what they thought about the food, and lessons I learned that week.
All these components will go into cookbooks that I'll make for Sophia and Olivia. Not sure if I'll give them the cookbooks for Christmas or wait until they are older. Still have time to think about this.
Here's the recipe for the Pumpkin Buns:
Ingredients:
1 envelope (1/4 ounce) active dry yeast
¼ cup warm water (100 to 110 degrees)
1 teaspoon plus 2 tablespoons granulated sugar
2 eggs
¼ cup (1/2 stick unsalted butter, melted (I used dairy-free butter)
1 can (15 ounces) solid-pack pumpkin
5 ½ cups all-purpose flour
¾ teaspoon salt
Filling:
½ cup (1 stick) unsalted butter, softened (I used dairy-free butter)
¼ cup granulated sugar
1 cup packed brown sugar
1 tablespoon cinnamon
Glaze:
2 cups confectioners’ sugar
3 tablespoons milk (I used dairy-free milk)
Directions:
Sprinkle yeast over warm water in large bowl. Add 1 teaspoon of the granulated sugar; let stand until foamy, about 5 minutes. Beat in remaining 2 tablespoons sugar, the eggs, butter, and pumpkin.
Gradually add 5 cups of flour and salt, scraping side of bowl until soft dough forms. Turn out on a floured surface and knead remaining ½ cup flour into dough, adding more if sticky. (Note: I did add quite a bit more flour because it was quite sticky.) Knead for 10 minutes, until smooth. Dough will be soft.
Grease a bowl; add dough. Cover with plastic wrap and place in a warm spot until doubled, about 1 ¼ hours.
Coat 2 13”x9” pans with non-stick cooking spray. Make filling: mix butter, granulated and brown sugars, and cinnamon in a bowl.
Punch dough down. Roll out into a big rectangle until it is about ¼” thick. Spread with the filling. Starting on one long side, roll up jelly-roll fashion. Pinch seam to close.
Cut the log crosswise into 24 generous 1” pieces. (I had about 36 pieces). Arrange half of the rolls, cut side down, in each prepared pan. Cover with plastic wrap and let sit in a warm spot until bunds double in size, about 30 to 45 minutes. (You can refrigerate one pan overnight or cover plastic with foil and freeze at this point. Thaw in fridge overnight, then thaw on counter while preheating the oven.)
Heat oven to 350 degrees. Uncover pans and bake buns until they are golden brown and bubbly, 28 to 33 minutes (thawed buns, 36 minutes). Transfer to a wire rack; let cool 10 minutes.
Glaze: blend confectioners’ sugar and milk. Drizzle over buns (about 1/3 cup per pan). Serve warm.
Thursday, April 22, 2010
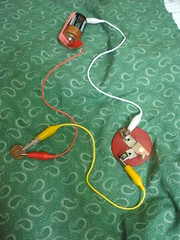
Olivia's Circuit
Both the girls have enjoyed the unit on electricity.
I use Sonlight's science curriculum (the 1+2 level) which has a lot of interesting experiments in it.
Tuesday, April 20, 2010
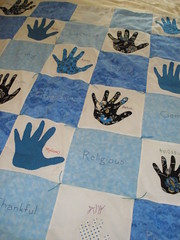
Birthday Quilt
The person's name is hand-embroidered by her/his hand.
On the blue flannel squares are qualities that describe my mom (one per square). All family members over the age of 7 years old were asked to describe my mom.
I took the most popular character qualities and put those at the top and worked my way down to the bottom of the quilt.
The quilt backing is fleece and it is filled with fiberfill so it can be washed easily (versus a sheep wool filling which I normally use for quilting).
The quilt is tied with hand-dyed yarn from South Africa. It is in shades of blue and green.
Monday, April 12, 2010
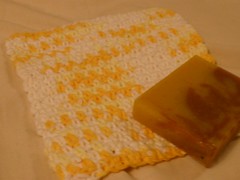
Crocheted Dishcloth
Finally got around to taking a picture of a dishcloth I made using a new stitch. I enjoyed learning something new.
The dishcloth is made from cotton yarn. Although it is all-natural, I think a softer yarn (e.g., bamboo) would have been a bit more comfortable to use for washing one's face. This would be good to use for scrubbing hands or washing dishes.
Saturday, April 10, 2010
Pillowcase Dress
I used a pillowcase, bias tape, and a floral fabric to create the dress. It is about a size 7 with adjustable ties at the shoulder. The instructions that I used for making the pillowcase dress are HERE. Little Dresses for Africa also has a tutorial with pictures HERE.
This was made to donate to Little Dresses for Africa which in turn distributes them to girls who are orphans in Africa. Many of them have lost their parents to AIDS and are on their own. They have one outfit...maybe two.
The pillowcase dress is an outfit that they receive to show them that someone cares about them.
I was inspired to make this dress because I had read about the project through a link on Twitter. There was a homeschool family who was making the dresses as one of their community service projects. After reading about Little Dresses for Africa as well as the need, I knew it was something that I wanted to do.
So, for about a month now, I’ve been working on the Little Dresses for Africa project. My goal for this project is threefold:
(1) to make a dress (or more) myself,
(2) to teach my daughters to each make a dress and donate them, and
(3) to teach a class at the homeschool co-op for upper-elementary, junior, and senior high students so they have an opportunity to make the dresses as well.
On Friday, April 9th, I made the dress. It ended up taking a bit longer than I anticipated, but I wanted to make the dress one that a little girl would enjoy wearing. The size of the dress is a 7. My 7 year old daughter wears a size 5, but could fit into it. I had her help me by trying on the dress and determining where to place the pockets.
So, as I was sewing on the bias tape, pockets, and trim at the bottom of the dress, I thought about a girl in Africa who would be receiving the dress. She would be about my daughter’s size…perhaps even around her age. I tried to imagine the difficulties already present in her young life…and how we often take for granted the simple things in our lives.
I took my time with making the dress because I want this little girl to know that someone does care and wants her to be comfortable and have something she can wear.
I added 2 pockets to the dress so the girl who receives it can put her hands in her pockets, collect natural things she finds on a walk, or carry a little toy or items around her home or village.
On the bottom of the dress, I added about a 2” trim of fabric that coordinates with the pockets.
I stitched and doubled stitched areas that I thought may receive more wear and tear. I want the dress to last for some time and not come apart since I’m not sure what sewing supplies the girl would have to mend her dress.
After I was done making the dress, I had my daughter try it on. She had a HUGE smile on her face, despite the fact that it was not her dress. I’m hoping that this is the same type of smile that the little girl who receives the dress I made will have on her face!
My youngest daughter said that she can’t wait to make a dress so it can go to another little girl. So, that’s the last part of my goal with this project: to help my daughters make dresses for Little Dresses for Africa.
In writing my thoughts, I go back to one thing that I read on another website about a group of women who made dresses for Little Dresses for Africa:
[In doing this project we are] "honoring a special group of moms... who can no longer hold their daughters or provide them clothes. Most died from AIDS or other illnesses and their children were left as orphans.
"We honor those precious moms by putting our hands to work and creating beautiful dresses for their little girls. We may not have changed the world, but for those little girls when they pull those dresses over their tiny heads – their worlds will change."
I’m hoping that the dress I made as well as the ones I’ve guided other children and teens to make do make a difference.
Friday, April 9, 2010
Gretel Hopping with Frisbee
The girls played on the swings while I threw the frisbee to Gretel. Gretel was adopted a couple of years ago. She's a German shepherd mix. The shelter thought she was mixed with a basset hound, but someone said she looks more like a coon dog. Who knows.
Although she enjoys fetching sticks and other toys in the backyard, this is the first year she's played with the frisbee. Check out her back legs - she's literally hopping! She was so excited to play frisbee in the backyard.
Thursday, April 8, 2010
Breadsticks
The goal is to try a new recipe each week; write a short review of it and any modifications made to the recipe; note any lessons learned; and take a picture of the final product.
My personal goal is to try 2-3 new recipes per week. I have so many recipes that I've clipped through the years that I've wanted to try. In this way, I am challenged to try them and document the process.
I'm thinking that I could combine all recipes, pictures, and commentary and make personalized cookbooks for my daughters. Kind of a legacy gift to them both.
This week, I made breadsticks, corn muffins, and oatmeal muffins. Two of the main lessons I learned were:
Be Resourceful – This week I continued trying to use what I had on hand. Ultimately, the goal is to clean out the cupboards and “start fresh” with a healthier way of eating. Rather than throwing out food/ingredients, I’m using up what is available.
Of course, I have to replenish the things I use often (e.g., baking powder, flour, sugar). It has been nice to have more room in the cupboards as I begin throwing away empty containers.
Be Willing to Take a Risk – I’ve had the Whole Foods for the Whole Family cookbook (where the oat muffin recipe is from) for several years now. There are many good, healthy recipes in there.
Even though Sophia and Olivia may not be totally enthusiastic about some of the new recipes I’m trying, at least I am serving them homemade, healthy food…not pre-packaged, processed food. (Okay…sometimes there’s pre-packaged food, but not as often as the made-from-scratch food.)
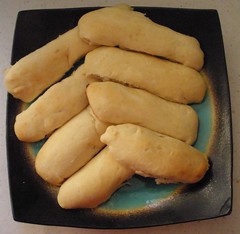
So, one of the recipes I made this week was for breadsticks. The breadsticks spread out quite a bit so they do need the 2” space between them otherwise they bake together which is what happened to me. However, they easily divide when they come out of the oven.
Both Sophia and Olivia loved the breadsticks – plain and right out of the oven. I tried the Parmesan butter on it. It was okay…nothing too flavorful. The girls suggested using the breadsticks with a homemade pizza dipping sauce that they like. This was an easy recipe to make, and despite the fact that there is no consistency in size or shape between the breadsticks, they were delicious!
Here's the recipe (it's from Taste of Home magazine):
Breadsticks with Parmesan Butter
Ingredients:
2 packages (1/4 ounce each) active dry yeast
2 tablespoons + ½ cup sugar (divided)
2 cups warm water, divided
3 tablespoons vegetable oil
1 egg
1 teaspoon salt
4 ½ - 5 cups all-purpose flour
½ cup butter, softened
2 tablespoons grated Parmesan cheese
¼ - ½ teaspoon garlic powder
Directions:
In a large mixing bowl, dissolve yeast and 2 tablespoons sugar in 1 cup warm water. Add the oil, egg, salt, 2 cups flour, and remaining sugar and water. Beat until smooth (I did this by hand, though it could be done by a mixer).
Stir in enough remaining flour to form a soft dough. Turn onto a floured surface; knead until smooth and elastic, about 6-8 minutes.
Place in a greased bowl, turning once to grease the top. Cover and let rise in a warm place until doubled, about 40 minutes.
Punch the dough down. Turn onto a floured surface; divide into 36 pieces. Shape each piece into a 6 inch rope. Place 2 inches apart on greased baking sheets. Cover and let rise until doubled (about 25 minutes).
Bake at 400 degrees for 10-12 minutes or until golden brown. Meanwhile, in a small mixing bowl, cream the butter, Parmesan cheese, and garlic powder. Serve with breadsticks.
Yield: 3 dozen breadsticks and 2/3 cup butter.
Saturday, April 3, 2010
Jam Muffins
I'm doing a "52 Weeks of Baking" swap on Swap-Bot. Each week, the challenge is to bake a new recipe, and then send the recipe, picture, and review of it to two partners.
During the first week, I made these jam muffins along with green onion drop biscuits and barbecued meatballs. Half of the muffins had strawberry jam and the other half had wild blackberry jam (the blackberries grow on the farm here).
I chose the three recipes from a collection of recipes that I’ve wanted to make for a long time, but haven’t gotten around to it.
Having the 52 Weeks of Baking swap is a great motivator for me – it holds me to a deadline and gives me something positive to work on and towards.
My thought is that it may make a nice recipe book for my daughters...a special gift of recipes that we’ve tried along with pictures.
So, early this morning, I sorted through all the recipes and pulled out all the ones that involved baking. From that, I selected the recipes above because they all had ingredients that I had on hand.
This has been a focus of mine over the past month of so – to use what I have rather than purchasing new ingredients. Of course, there are some items that I need to purchase (e.g., milk, eggs) in order to make other items, but for the most part I’ve reduced the food bill substantially.
In terms of experience gained today, I think the main two things I learned were:
- Be Flexible – although I thought I had all the ingredients for the recipes, in actuality…I didn’t. The biscuit one, in particular, I had to modify 3 out of the 9 ingredients either because I didn’t have enough of something, had run out of it, or it had to be changed due to a dairy allergy (my oldest daughter is allergic to milk/dairy products).
- Remember What Mom Did – having grown up during the Depression, my mom was incredible in terms of being able to stretch the food budget. She would make things small so we could have 2 or 3 of the item.
As a child, I always thought I was getting a lot of something. In reality, it was probably only 1 serving. The barbecued meatball recipe says to make 1 ½ dozen meatballs from a pound of hamburger. By making them half that recommended size, I filled an entire cookie sheet with meatballs.
So, back to the jam muffins...
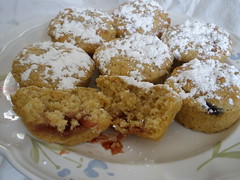
My oldest daughter wanted to try one of these right after I put the confectioners’ sugar on top of the muffins. “They look really good!” she said.
Cut one open to take a picture, and the jam had sunk to the bottom of the muffin rather than sitting in the middle like the picture showed in the magazine. It’s not a huge deal, but from an aesthetic standpoint, it doesn’t look as nice as the magazine picture.
The muffin is light and tasty. Having the jam right in the center of the muffin will make it much easier in the morning – no need to cut open the muffin and spread it with jam. It’s already done!
I would make this recipe again and continue to try different jams that I’ve canned during the summer.
Here's the recipe. It's from Family Fun magazine:
¾ cup seedless raspberry jam (I used homemade strawberry jam for half of the muffins and homemade wild blackberry jam for the other half of the muffins)
1 ½ cups all-purpose flour
½ cup whole wheat flour
½ cup sugar
2 teaspoons baking powder
1 teaspoon baking soda
½ teaspoon salt
1 cup plain low-fat yogurt (I used dairy-free plain yogurt)
¼ cup vegetable oil
1 egg
1 teaspoon vanilla extract
Confectioners’ sugar
Heat the oven to 400 degrees. Grease the bottoms only of 12 standard muffin cups. Wisk the jam in a small bowl until smooth and set it aside (I didn’t do this).
In a large bowl, whisk together both flours and the sugar, baking powder, baking soda, and salt. In a medium bowl, whisk the yogurt, oil, egg, and vanilla extract until well blended. Stir the yogurt mixture into the dry ingredients just until the batter is blended.
Fill the cups halfway with batter and cut a spoon to make a shallow well in the center of each. Fill each well with a rounded teaspoon of jam and then cover the jam with more batter.
Bake the muffins for 12 minutes or until a toothpick inserted into the center of one comes out clean (I tested the side where the dough was – not the jam). Let the muffins cool in the pan on a wire rack for 5-10 minutes before removing them. Dust the tops with confectioners’ sugar.
Makes 1 dozen.
Thursday, April 1, 2010
Easter Eggs
When I look through my file about Easter filled with magazine clippings of ideas for crafts, food, and other activities to make the holiday even more meaningful, I pull out some creative and unusual ways to color the eggs.
Yet each year, the girls simply want to put the eggs in the cups of dye and let them sit in the colored water bath until they come out the color they want.
It's simple. Uncomplicated. Enjoyable.
Perhaps it's a needed reminder of how to live each day...and to celebrate Easter.


