Wednesday, September 3, 2014

How to Dehydrate Fruit - Sophia's Grand Champion 4-H Project

One of Sophia's project for her 4-H food preservation projects this year was dried fruit. She competed at the county fair and won a grand champion ribbon plus the opportunity to compete at the state level.

Sophia meeting one-on-one with the judge at the county level

On August 29th, Sophia went to the Minnesota State Fair and participated in a conference judging session about food preservation. She prepared a speech ahead of time and had practiced what she wanted to say. When she got there, she was able to draw from her speech as she did her presentation. 

Sophia in her conference judging group at the State Fair.

After her group was done with the judging process, they each received ribbons and were told to return at noon to see if their project won the grand champion award. 

We spent some time exploring the State Fair and enjoying lunch in the 4-H cafeteria on the second floor of the 4-H building. Then we went back to the food preservation area to see how her project did. There was a purple ribbon sticker on her name card! She won the grand champion ribbon!


In part, this is what she shared with the judge and the other three competitors with whom she was grouped:

For my project I decided to focus on dried fruit. I learned about the health benefits of dried fruit, the history of it, and how to dry fruit.

I dried six types of fruit – three of which were grapes (red, green, and purple).

Sophia's project at the State Fair.

So, why would you want to dried fruit? Dried fruit taste good, provides concentrated energy, and helps you stay full for a long period of time.

There are a lot of ways to eat dried fruit. You can eat it plain, serve it with a variety of dips, or try them in different recipes.

People tend to dry fruit more than vegetables because vegetables lose a lot of their flavor whereas dried fruits do not. Vegetables – compared to fruits – also lose a lot of their vitamins in the drying process. The acidity of fruits preserves the vitamins better.

Three types of fruit that Sophia dried.

Dried fruit also has a lot of health benefits because they retain most of the nutritional value of fresh fruits.

Dried fruits are a good source of fiber and potassium. This can help decrease a person’s risk of getting heart disease, diabetes, and certain types of cancer.

Dried fruits provide the same amount of fiber as fresh fruit. For example, one tablespoon of raisins contains the same fiber as 27 grapes.

Sophia weighed all the fruit before drying it 
so she can see the amount of water in each type of fruit.

Despite the positive benefits, there are some things to be aware of about dried fruit:

Dried fruits should be eaten in moderation because they contain many more calories per serving than fresh fruits.

Sophia slicing pineapple rings.

If you aren’t drying own fruit, be careful about what you purchase at the store. Some dried fruits contain sugars added in processing which increase its calorie content.

So, how long has dried fruit been around?

The earliest recorded mention of dried fruit can be found in Mesopotamia tablets dating around 1700 BC which contain the oldest known recipes.

When fresh foods were abundant, our hunting-and-gathering ancestors would dry their excess food so that they had something to eat when the winter months came and food was scarce.

Although we are still drying food thousands of years later, the way we are doing that is different.

First, select fresh and fully-ripened fruit.

Sophia slicing bananas.

Wash and clean it to remove dirt. Throw away any fruit that is decayed, bruised, or moldy. All of these things can affect the food that is being dried.

Pretreat fruit to help keep the light-colored fruit from darkening during drying and storage.

Placing bananas in water with Fruit Fresh.

When I dried the fruit, I put it in water with Fruit Fresh which is antioxidant mixture. It is not as effective as ascorbic acid, but you can get it easily at the grocery store.

Cut peeled fruit and then soak it in the solution for ten to 15 minutes. Remove with a slotted spoon and drain well.

Put the pretreated fruit on the trays in single layers. Dry at 140 degrees F in a dehydrator. The length of time needed to dry fruits will depend on the size of the pieces being dried, humidity, and the amount of air circulation in the dehydrator.

Thinner slices and smaller pieces will dry more quickly than larger, thicker pieces or whole fruits.

Fruit should be dry enough to prevent bacterial growth and spoilage. To test foods for dryness, remove a few pieces and let cool to room temperature. Squeeze a handful of the fruit. If no moisture is left on your hand and pieces spring apart when released, they are dry.

When drying is complete, some pieces will be moister than others due to their size and placement during drying. Grapes and pineapple are done when you squeeze them gently and there is very little “squish” left. Bananas are done when you bend them and they are not pliable.

Conditioning is a process used to evenly distribute the little moisture that is left in the fruit throughout all of the pieces. This reduces the chance of spoilage, especially from mold.

To condition, place cooled, dried fruit loosely in large plastic or glass containers, about two-thirds full. Cover and store in a warm, dry, well-ventilated place for about four to 10 days.

Stir or shake containers daily to separate pieces. If beads of moisture form inside the container, return the food to drying trays for further drying, and then repeat the conditioning process.

Pack cooled dried food in small amounts in dry glass jars (preferably dark) or in moisture- and vapor-proof freezer containers, boxes, or bags. You want to pack dehydrated fruit in small amounts, because each time a container is reopened, the food is exposed to moisture and air that cause spoilage and affect food quality.

Store in a cool, dry, dark place. Dried fruit can be stored for one year at 60 degrees F but for only six months at 80 degrees F.

In closing, if you haven’t tried drying fruit, I encourage you to try it. It’s a great snack and a different way to enjoy fruit.

Tuesday, September 2, 2014

Circular Acrylic Painting

This summer, Olivia did some painting projects that she enjoyed. One of them was an acylic painting that she entered into the county fair.


We found the idea on a pin on Pinterest. The pin doesn't lead to anything which is fine. The visual instructions are on the pin.

Basically, Olivia used three different colors of acrylic paint. She put them on a plate and then randomly painted two sheets of paper.


Each of the sheets had a slightly different pattern.


When she was done, she used a one-inch circular punch and cut out circles from the two sheets of paper.

She made a grid on the paper using a ruler and a very light pencil. This helped her place the circles on the page in straight lines. She glued the circles onto the white piece of paper and pressed it under a book.


She was very happy with how the final project turned out.

Back to Homeschool Day

This year for our back-to-homeschool day we had three special meals. For breakfast, we had the girls' favorite breakfast: caramel rolls.

I used red placemats that tied into the color of the day (a Waldorf practice that we are going to try doing again this year). We used the china plates and nice water glasses to hold our beverage of choice (orange lemonade or chocolate milk).

Each of the girls had a name marker at their place setting with their name and what grade they currently are in.

It seems like yesterday that they were in early elementary school. This year, Olivia is in sixth grade...the last year of elementary school.


 Sophia is in eighth grade...the last year of middle school.


For lunch, we went on a picnic.


I took a look at the ideas I had pinned on Pinterest for picnics and chose some of the items to take along. Some of the items were included in our sandwich while others we had on the side including:

- Salami slices and/or meat sandwiches
- Variety of cheeses either on the side or in the sandwiches
- Pickles
- Chips
- Potato salad
- Special rolls to use for sandwiches
- Fresh fruit (grapes)
- Water


We enjoyed feeding the seagull that was hanging out near our table.


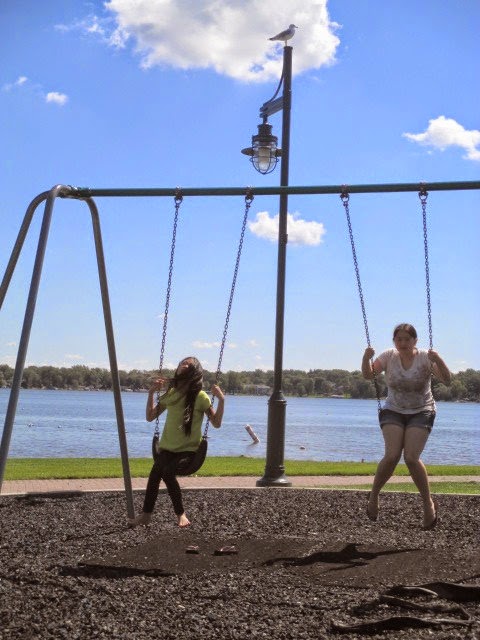
The girls played on the swing for a while. Notice the seagull who is sitting on the post. It flew up to watch them after we were done feeding it.


We took some pictures to mark the first day of school - on the dock at the Forest Lake beach, by the maple tree with its changing leaves, and by pots of beautiful annual flowers in shades of purple.


For dinner, we had Hawaiian Bread Sandwiches that were delicious.


Also enjoyed orange lemonade. It's from a recipe I found on Pinterest.


I had hoped to do a more elaborate meal and table setting like I saw on Jen Lund's blog.

However, with homeschooling during the entire day (9:00 a.m. to 4:30 p.m.) there wasn't time available to create special table settings and a a time capsule. And, frankly, I was tired. It was a fun and interesting transition back to homeschooling, but tiring.


We just continued with our theme of red place settings with the china plates and nice glasses.

All in all, it was a great start to the first day back to homeschooling!

Making Homemade Jelly Mints (Tutorial)

Each year for 4-H, the teen ambassadors choose a theme for special projects that youth can do for the fair but are not eligible to go to the State Fair. This year the theme is "Candyland."

As we were looking on Pinterest, we came across a pin for Hello Jelly Mints that led to Dixie Crystals.

The recipe is very simple, although the rolling out and forming of the gumdrop-filled logs is of medium difficulty, especially for Olivia who made the mints.

The yield for the recipe is between 80-90 pieces. However, Olivia was able to make 106 mints. These are great for a party or a light dessert after a meal.


Ingredients:

4 cups powdered sugar
1/4 teaspoon peppermint extract
1/8 teaspoon salt
1/4 cup cold water
Gumdrops cut into narrow strips

You will also need: a mixing bowl, measuring cups and spoons, and a knife or kitchen shears.

Directions:

Put powered sugar, peppermint extract and salt into a mixing bowl.


Add water gradually, stirring until sugar is moist.


Knead (mix thoroughly with hands) until mixture is stiff enough to roll out.


Divide candy into small pieces, about 1 and 1/2 tablespoons for each piece.


Flatten candy into rectangle shapes and place gumdrop strips in center.


Roll candy around gumdrops.


Then slice and serve.


The candy lasts for quite a while in the refrigerator. It's a nice, light treat to have that we enjoyed after meals and in the middle of the afternoon. Everyone who tried the Jelly Mints liked them. We will definitely make this recipe again.

Monday, September 1, 2014

Labor Day Treats - Red, White & Blue Shortcake + Orange Lemonade

We made a couple special treats to enjoy with our indoor picnic on Labor Day. In addition to bratwurst, hot dogs, baked beans, and potato salad, Olivia and I made Red, White, & Blue Shortcakes from the Five in a Row Cookbook.

Homemade shortcakes with fresh strawberries and blueberries
topped with whipped cream.

We also made Orange Lemonade that is from a pin on Pinterest. It led to Holidays Central that had a special focus on healthy food to serve on Labor Day.

Orange Lemonade


Ingredients

1 1/4 cups water
1 cup sugar
3/4 cup lemon juice
3/4 cup orange juice
2 teaspoons grated lemon peel (we didn't use)
1 teaspoon grated orange peel (we didn't use)
3 cups water
Ice

Directions

Boil 1-1/4 cups water and 1 cup sugar to a boil. Reduce heat and simmer for 10 minutes. Allow to cool and then pour into a pitcher.

 Stir in 3/4 cup lemon juice, 3/4 cup orange juice, 2 teaspoons grated lemon peel and 1 teaspoon grated orange peel.

Cover and refrigerate at least 1 hour. Stir in 3 cups of water and serve over ice.

101 Days of Summer Fun - Update #14

This is the final week of 101 Days of Summer Fun. This is what we did:

Saturday, August 23 - We relaxed during the day and chose to do whatever we wanted to do. It's been nice to have free time and choose to spend our time how we want to spend it.

Sophia and Paige went out in the evening for their monthly activity.

Sunday, August 24 - Sophia, Olivia, and I took my mom to the church festival at St. Anne's in Hamel. We had a very generous and delicious meal of chicken, dressing, gravy, coleslaw, rolls, beans, and apple crisp.


After we ate, we went to their garage sale and ended up finding tennis rackets and covers for only $5 each. The girls also found hard-cover books for only $1. Great deals!

We played a game of Bingo, and then it was time to head back home. We all had a nice time together.

Monday and Tuesday, August 25-26 - These were days of clean up and repair. The dumpster that has been sitting in the front yard along the driveway for what seemed like most of the summer thanks to multiple home reconstruction projects is finally gone. What a relief!

The soft-water system was repaired and the old system hauled off on Tuesday. Now we have soft water again plus a reverse-osmosis system in the kitchen since our water has tested with a too-high of a nitrate level for drinking because of being surrounded by farmland that is being traditionally farmed with lots of chemicals.

Wednesday, August 27 - Mary B. came over to spend the afternoon with Sophia and Olivia. They made a chocolate zucchini cake that had a ganache filling in it. It was one of the best cakes we've ever tasted - super moist and lots of flavor.


Thursday, August 28  - Sophia spent time preparing for her presentation at the State Fair tomorrow while Olivia finished reading a book that she's been working on for a while now.

Friday, August 29 - Sophia and I headed to the Minnesota State Fair early in the morning so she could be at the information session by 8:30 a.m. She was in the first judging group for food preservation which was nice.

Both of us were surprised that the other youth in her group were all boys. One did jam, another jelly, and a third pineapple salsa. Sophia did a project on drying fruit.


After her judging, she changed from wearing a dress to more comfortable clothes. We went around the fair and looked a natural playground exhibit.


We spent some time in the Eco-Experience building and learned about a variety of things related to preserving the environment. We even raced little cars that had vegetables attached to them down a racetrack.

Around lunch time, we went back to the 4-H so Sophia could get her t-shirt that they give out each year (this year the color was purple). After that, we enjoyed a healthy and well-balanced lunch.


There were chicken fajitas filled with grilled vegetables, rice, and beans. You could add salsa and sour cream if you wanted to on top of that. They also had a plate of nacho chips with cheese. There was homemade salsa on the side which was delicious. There were two types of bread with butter; key lime cake or Rice Krispie bars; watermelon, cantaloupe, or fruit bowl; and chocolate or white milk.

After lunch, we went down to see the judges' decision about who won the grand champion award for food preservation.

When we found Sophia's project, I noticed the purple sticker next to her blue ribbon sticker. Sophia won the grand champion award!


Needles to say, she was SO happy! She had her picture taken by the 4-H representative who was taking photographs of all purple-ribbon winners at the state level.


Afterwards, we went to the butterfly house where we spent a lot of time enjoying the butterflies that flew onto us and/or we placed on us.


It had been a long day, so Sophia just wanted to spend time at the butterfly exhibit. As we walked out, we saw Lee at the KOOL-108 booth and stopped by to say "hi" to her.


We got a Icee on the way out to enjoy on the ride home. 

Saturday, August 30 - We were going to do monarch tagging today, but we all decided that with it being so cold and rainy that it wouldn't be as enjoyable walking through wet grass and trying to catch monarchs. Perhaps next year.

Sunday, August 31 - Both of the monarch caterpillars we found in our backyard and that we have been feeding milkweed leaves, are now in their chrysalises. Now we wait as the caterpillars transform themselves into butterflies over the next couple of weeks.


We'll release the butterflies as soon as their wings dry and are strong.

Monday, September 1 - We took the dogs and went to Chuck and Don's Pet Food Outlet so we could use the gift card that Aspen won in the Northwoods Humane Society Summertime Foto Fling contest.

We got a special bowl with deep groves in it (patterned like a flower) to put Aspen's food in it. It helps dogs who eat very fast slow down. Getting their food is a bit more work - kind of like it is in the wild.

Also bought some food with bison in it (which they love to eat!), a harness for Aspen for walks since she's strong and pulls which is not a good combination on her neck and trachea, and some treats.  Even with all those items, we still have $35 leftover to spend on more items!


When we came home, Olivia made a recipe from her Five in a Row cookbook that she's been working on since third grade. She has about one-fourth of the recipes left in the book to make.


With each of the recipes, I take pictures and we've put them into her cookbook (it's like a scrapbook/cookbook) so she knows what the food looked like and the process she went through to make some of the recipes.

Today's recipe was red, white, and blue shortcakes.


Aspen found a great spot to lay down right at Olivia's feet. She was hoping that Olivia would accidentally drop some fruit or dough.


We had the shortcakes after dinner. They were delicious! You can't go wrong with fresh fruit and homemade shortcakes...not to mention real whipped cream.


So, as I look back on the summer, it is very different than what I envisioned. Although I had anticipated doing a fun activity each day of the week during the summer, that is far from how it played it.

At the beginning of the summer and about mid-way through it we were doing different activities each day. Some were ones I planned, and others were ones that simply came up and we did those instead.

By the middle of the summer, however, we were undergoing a major and unexpected reconstruction project on our upstairs bathroom and the duct work throughout the home. That greatly changed what we were able to do - both in terms of leaving our house (since construction workers were here daily for over a month) and financially (since it was a major investment that we had not planned on undertaking this summer).

We found that some of our most enjoyable time this summer was simply relaxing. With our homeschool schedule and activities, many days during the majority of the year have some sort of activity going on. To have a block of time where we didn't have to go anywhere or do anything that was deemed "educational" or related to homeschooling was a pleasant and well-needed respite.

Sunday, August 31, 2014

Peach Piecakes (Pie+Cake = Piecake)

For quite a while I've been .wanting to make peach piecakes. I saw a pin on Pinterest that led to Bakingdom.

The person who made them did a nice job with the lattice crust. By the time the top-crust and lattice work came around, I didn't take the same amount of time and effort to make the little piecakes look as neat and orderly as the original pin on Pinterest.

Oh well...it doesn't really matter in the greater scheme of life. What matters is how the little piecakes taste which is incredible!


It's the best of both worlds: a peach pie and a vanilla cake topped with spiced peaches.

The recipe is one that requires you to move quickly once the baking process starts. It is best to have everything ready to go - the pie crust, peach filling, and cake batter - before the first step of putting the lower pie crust in the oven. Otherwise, you'll be scrambling to try to do the filling and batter in only ten minutes which is not enough time to get both done.

The original recipe says that there is enough to make 24 standard-sized piecakes. I found that the there was pie crust to make 12 piecakes. There was leftover cake batter and peach filling which I put into a small pie plate and baked. 

Perhaps doubling the pie crust ingredients (listed below) would result in a sufficient amount of dough for 24 piecakes.

Ingredients

FOR THE PIE CRUST
2 1/2 cups all-purpose flour
1/4 cup sugar
1 teaspoon salt
8 tablespoons shortening, cold
1/2 cup (1 stick) unsalted butter, cold, cut into small chunks
6-8 tablespoons cold water

FOR THE CAKE
2 egg whites, at room temperature (save the yolks to use in an egg wash, if desired)
1/4 cup milk, at room temperature
1 teaspoon vanilla extract
3 tablespoons unsalted butter, at room temperature
1/2 cup, plus 2 tablespoons all-purpose flour
5 tablespoons sugar
1 teaspoon baking powder
1/4 teaspoon salt

FOR THE PEACH FILLING
4 peaches, peeled, pitted, quartered, and sliced thin
1/4 cup brown sugar, packed
1/4 cup sugar
1/2 teaspoon cinnamon
1/4 teaspoon nutmeg
1 teaspoon lemon juice
2 teaspoons cornstarch

To make the crust, mix the dry ingredients for a couple of seconds to combine, Add the shortening and mix until it looks like wet sand. Add butter until it is in tiny pieces.

Add about 6 tablespoons cold water and begin mixing with a fork. Once it is in dough-form, knead it on a floured surface.

Divide the dough in half evenly and shape into two balls. Put into a container and refrigerate for at least two hours or over night.

This is important: once the pie crust is chilled, make the cake batter. You want to have the cake batter and the peach filling ready before you bake the pie dough.

Combine the eggs, milk, and vanilla in a bowl, and whisk together. Set this aside.

Beat the butter on low speed until the mixture. Add the egg mixture. Then add the dry ingredients. Set aside while you prepare the pie crusts.

Next, make the pie filling: Combine the peach slices, sugars, and spices in a medium bowl, tossing to coat the peaches thoroughly. Stir in the lemon juice and corn starch until well combined. Spread in a baking dish. This will be baked along with the piecakes.

Preheat oven to 425 degrees. Lightly coat muffin pan with nonstick cooking spray; set aside.

Remove your one of the balls of pie dough from the refrigerator and roll it out to a little less than 1/4-inch thick. Cut several 4 to 5-inch circles out of the dough, re-rolling the remaining dough, as needed.

Place each circle into the cup of the prepared muffin pan, pressing gently into the corners and trimming any excess dough away. Bake for 10 minutes. (Note: when I did this the pie crust shrank down to about halfway down each muffin tin. I thought it would be an issue when removing the piecakes, but it didn't matter. They came out easily.)

Remove the pie crusts from oven and immediately fill each muffin cup with 1 tablespoon of the cake batter.

Bake the filled pie crusts and the pie filling (which is in a separate pan) for 10 minutes.

While it is baking, roll out the remaining pie dough and cut into 1/4 to 1/2-inch strips.

Remove the piecakes and filling from the oven and place about 2 tablespoons of the pie filling on top of each piecake.

Weave the pieces into lattice tops on each of the piecakes. Be careful as you weave the lattice tops since the peach filling is quite hot by this point. (Thus, one of the reasons I simply placed the strips on top of each piecake rather than weaving them)

Return to the oven and bake until lattices are light golden brown, about 10 minutes. Allow to cool completely before serving.

There's a recipe for Ginger Whipped Cream. However, we used whipped cream that we had on hand that was already prepared. Nonetheless, perhaps this is something that we would try the next time that we make the piecakes:

Ingredients

1 cup heavy cream
2 tablespoons sugar
1/2 teaspoon ground ginger
1 teaspoons vanilla

In a large bowl, whip the cream on medium high speed until it forms soft peaks. Add the sugar and ginger and continue whipping until firm peaks form. Stir in the vanilla. Chill until ready to serve.

Protractor Art

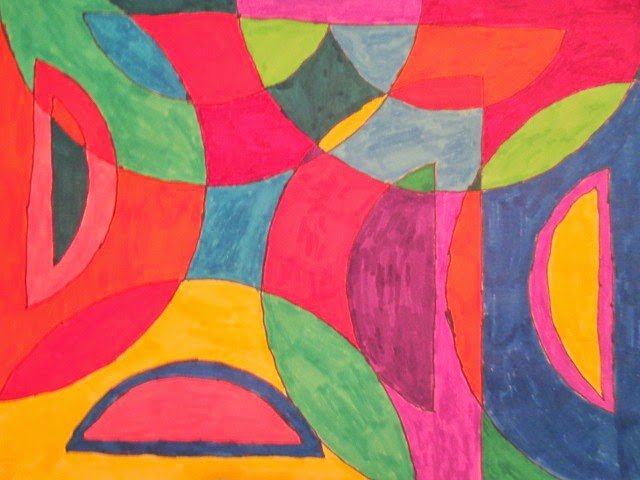
One of the 4-H projects that Olivia did for the county fair this year was Protractor Art. The idea - which combines art with math - came from a pin on Pinterest that led to Art Is What I Teach.

In and of itself, the project looked interesting and one that Olivia wanted to try. However, I wanted her to see what the inspiration was for the project: Frank Stella's Protractor Series.

After learning about the artist and looking at his work on the internet, Olivia drew her own design using a pencil and protractor.

She outlined her design with a Sharpie marker, and then colored it with colored pencils.


She thoroughly enjoyed this project and was proud to have it displayed at the county fair.


Rappaccini's Daughter - Read 52 Books in 52 Weeks - Week 36

For the 36th week in the Read 52 Books in 52 Weeks challenge, I read Rappaccini's Daughter by Nathaniel Hawthorne.


Many years ago I watched this short story on a DVD from the library. I was intrigued and enjoyed the movie, so I was happy to be able to read the book this week.

Rappaccini's Daughter was published in 1844, and is about Dr. Giacomo Rappaccini, a medical researcher in medieval Padua, Italy, who works in isolation as he grows poisonous plants in his garden. He raises his daughter, Beatrice, to tend the plants, and she becomes resistant to the poisons. However, in the process of caring for the plants, she herself becomes poisonous to other living things (human and non-human).

A student, Giovanni Guasconti, moves into a home next door that overlooks the garden. He is amazed at the beauty and diversity he sees within the garden. Even more interesting to him is the beautiful daughter of Rappaccini.

He is unaware of the poisonous nature of both the plants and Beatrice. Yet, he is fascinated by Beatrice's odd relationship with the plants as well as how fresh flowers wither and how an insect died when exposed to her skin or breath.

At this point, it's too late for Giovanni. He's fallen in love with Beatrice and enters the garden. He meets with her many times while ignoring the warnings from his mentor, Professor Pietro Baglioni. He persistently warns Giovanni that Rappaccini and his work should be avoided.

Finally, Giovanni realizes that Beatrice is poisonous because she has been raised in the presence of poison. Beatrice urges Giovanni to look past her poisonous exterior and see her innocent and pure nature. Giovanni, although skeptical, continues to see Beatrice.

Eventually, Giovanni becomes poisonous himself due to being around the plants and Beatrice. The professor brings a tiny vial of a powerful antidote to Giovanni with the instruction that if he gives some to Beatrice that it will overcome the poisons in her.

However, as the professor leaves Giovanni with the vial, he says to himself, "We will thwart Rappaccini yet! But, let us confess the truth of him, he is a wonderful man! - a wonderful man indeed! A vile empiric, however, in his practice, and therefore not to be tolerated by those who respect the good old rules of the medical profession."

Shortly thereafter and with hope, Giovanni brings the antidote to Beatrice so that they can be together. However, the antidote kills her rather than gets rid of her poisonous nature. In essence, the professor uses medicine in an equally malicious way as the father did...even though the original intent may not have been evil.

As she is dying, Beatrice shows her frustration and anger at what her father had done to her and, as a result, the isolated life she was forced to lead.

Yet, he claims that his intentions were beneficial to her and meant to protect her:  not only did Giovanni enter her life and become just like her because his "science, and the sympathy between thee and him, have so wrought within his system that he now stands apart from common men, as thou dost, daughter of my pride and triumph, from ordinary women."

He continued when Beatrice said her life was miserable. "Dost thou deem it misery to be endowed with marvelous gifts, against which no power nor strength could avail an enemy? Misery, to be able to quell the mightiest with a breath? Misery, to be as terrible as thou art beautiful? Wouldst thou, then have preferred the condition of a weak woman, exposed to all evil, and capable of none?"

Ultimately, there was an antidote far more powerful than what Rappaccini created. And, so, the story ends with loss of a daughter, a potential spouse, and of power and control.

There are so many interesting themes within this story. Two, though, stand out:
- Man versus Science - which is more important - life or science?
- Man versus Self - do you pursue what is known to be bad for personal pleasure or gain?

This is a short story that should be read repeatedly because each time the reader will be left with a deeper understanding of these and other themes that the author wanted to convey.

Looking for 48 Acts of Kindness for My 48th Birthday?

On Sunday, July 13th, an article about my 48 acts of kindness for my 48th birthday was featured in the St. Paul Pioneer Press.

To read about each of the acts of kindness and see pictures of what I did, please visit my blog post about it HERE.

To read the article in the St. Paul Pioneer Press, please visit HERE.

Saturday, August 30, 2014

Tutorial: Feather Pens

Olivia has a lot of feathers and pens. What should she do with them? Is there something that could put both to good use?

Absolutely...she made feather pens!

The idea came from a pin on Pinterest that led to Huffington Post which then led to Crafty Endeavor.

This is a very easy craft project that included the following materials:
- Three pens
- Three large feathers
- Lace - from our bin of different types of laces
- Green floral tape

The first step is to wrap the tape around the pen. To do this, she put the feather almost to the base of the pen. She used the floral tape at the base of the pen and feather and then worked her way up the pen to the top.


Floral tape is sticky on on both sides which is nice - it grabbed onto the pen, the feather, and itself as Olivia worked.


After the tape is on the pen and the feather firmly attached, Olivia wound the lace around the pen. It is overlapped slightly so none of the floral tape is exposed.


The finished feather pens took less than a half hour to make. Now she has unique pens to write with...and ones that will be intriguing for the cats to watch as she writes.